Pricing your custom bag for Kickstarter is all about balancing costs, value, and backer expectations. Here’s what you need to know:
- Understand Your Costs: Break down material, labor, and customization expenses. Include a 10–20% buffer for unexpected costs.
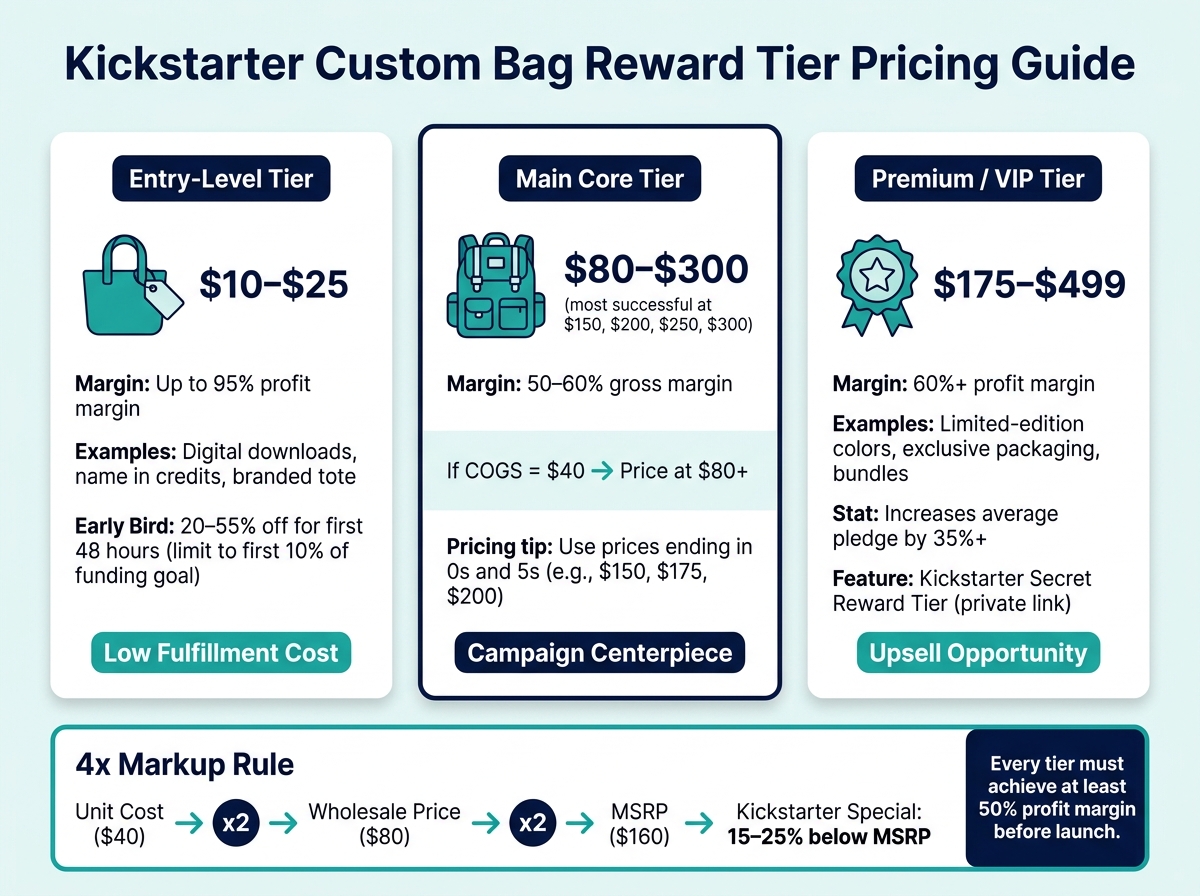
- Set Tiers Strategically: Offer entry-level rewards ($10–$25) with high margins, main tiers priced at 50–60% gross margin, and premium options for enthusiastic backers.
- Account for Shipping: Calculate domestic and international shipping separately, including packaging and platform fees.
- Test Your Pricing: Use feedback and tools like pricing calculators to ensure profitability, aiming for at least a 50% margin on all tiers.
The goal? Ensure your campaign not only funds but remains profitable. Every pricing decision should align with your production, fulfillment, and market strategy.
Understand and Calculate Your Production Costs
Start by figuring out your exact production cost. This is your foundation – skipping this step can lead to campaigns losing money, even when they meet their funding goal. A clear understanding of this baseline will help you break down costs effectively.
Break Down Material Costs
Every component of your bag has a price tag: the main fabric, lining, zippers, buckles, straps, padding, and hardware. For a sports or athletic bag, common materials include 600D polyester or nylon, YKK zippers, and reinforced stitching. Each of these needs to be sourced and priced individually. Make sure to get precise quotes from your manufacturer, as costs will vary depending on both quality and quantity.
Account for Labor and Manufacturing Expenses
Labor costs are influenced by the complexity of your bag and the size of your production run. Smaller batches (10–100 units) will have higher per-unit labor costs because setup time and machine calibration are spread across fewer items. Your Cost of Goods Sold (COGS) should include not only the base production fee but also warehousing, packing, and handling costs. It’s a good idea to incorporate Quality Control (QC) checkpoints during production – don’t forget to account for the time spent on inspections.
"Creators are responsible for the project idea, design, manufacturing, shipping, and customer service." – Double Jump Media
If your bag includes custom features, be sure to calculate those costs as well.
Include Customization Costs
Customization adds expenses that are often underestimated. Features like embroidery, screen printing, woven labels, PVC patches, or engraved hardware come with extra costs per unit. Embroidery and custom hardware, for instance, are more labor-intensive and carry a higher price tag compared to standard printing. Decide on your logo or design method during the prototyping phase to avoid surprises later. Plan for a 3–7 day sampling period to ensure the quality meets your expectations before full production begins.
Finally, include a 10%–20% contingency buffer to cover any unexpected overruns or errors. Once you’ve calculated all these factors, you’ll have a clear production cost – a crucial step for everything that follows.
sbb-itb-1e6451b
Set Pricing Based on Minimum Order Quantities (MOQ)
Once you’ve nailed down your production costs, it’s time to adjust your pricing to include Minimum Order Quantity (MOQ) requirements and any related fees. MOQ refers to the smallest number of units your manufacturer is willing to produce, and for Kickstarter creators, it represents more than just a factory rule – it’s the minimum threshold your campaign must hit to move forward with production. If your reward pricing is set too low, you might meet your funding goal but fall short of covering factory costs after platform fees.
Since MOQ is non-negotiable for fulfillment, you need to ensure your campaign raises enough money. For example, if production costs $8,000, aim for $8,800 to account for fees. Additionally, think about how your initial investment in creating a prototype fits into your pricing strategy.
| Production Scale | Typical MOQ | Ideal For |
|---|---|---|
| Prototype/Sample | 1 unit | Design validation and campaign photography |
| Small Batch | 10–100 units | Early Bird rewards and low-risk launches |
| Mass Production | 500–1,000+ units | Main reward tiers and retail distribution |
Prototype Development and Pricing
Your prototype represents a one-time cost that’s separate from your per-unit production expenses. This phase includes design iterations, material testing, and creating samples. It’s important to price this step independently and not try to recover it entirely through your lowest reward tier.
When planning your prototype budget, include time for sampling (usually 3–7 days), design tweaks, and campaign photography. These are upfront expenses that should be part of your overall project budget, not factored into the cost per backer. Keeping prototype costs distinct simplifies the transition to discussing small-batch production.
Small Batch Production for Kickstarter
For first-time campaigns, small-batch production (50–100 units) is a smart approach. While the per-unit cost will be higher compared to mass production, the financial risk is much lower. Use these higher small-batch costs as the foundation for your reward pricing instead of relying on the reduced rates from larger production runs.
"I consider a successful campaign one that ends up in the black at the end of the day, meaning that it raised more than it cost to fulfill." – Russell Nohelty, USA Today–bestselling author and publisher
If your campaign exceeds expectations and you hit higher production volumes, the reduced per-unit costs will create additional profit margins. Think of these savings as a bonus rather than something your pricing strategy depends on. By building your pricing conservatively, you leave room for unexpected growth to work in your favor.
Build a Tiered Reward Structure That Works
Kickstarter Bag Pricing: Reward Tier Structure & Margins
A well-thought-out reward structure helps backers easily decide which tier suits them best. Matt Olick, Founder of Prelaunch Club, explains:
"Ideally, the transition between tiers is smooth. This allows their eyes to glide down the ramp, easily digesting the prices."
Backers typically scroll through the options until they find one that matches their budget and expectations. Campaign data reveals that having exactly six reward tiers strikes the right balance – offering enough variety without overwhelming potential supporters.
Set Entry-Level Tier Pricing
The entry-level tier should lower the barrier for backing your project. Pricing this tier between $10 and $25 is ideal, focusing on rewards with minimal fulfillment costs. Examples include digital downloads, a name in the credits, or a simple branded tote bag. These types of rewards can deliver profit margins as high as 95%, ensuring even small contributions make a meaningful impact.
To create urgency and excitement, offer Early Bird pricing at 20%–55% off for the first 48 hours. Limit these discounted slots to the first 10% of your funding goal to maintain exclusivity. This entry-level tier sets the foundation for encouraging backers to explore higher-value options.
Price the Main Tier Around Core Features
After establishing your entry tier, focus on your core offering – the centerpiece of your campaign. This tier should deliver clear, tangible value. For instance, if you’re running a custom bag campaign, this tier would include the bag with all its features. Aim for a 50% to 60% gross margin.
To calculate pricing, consider your cost of goods sold (COGS). For example, if your COGS is $40 per unit, your main tier should be priced at $80 or above. Campaign data shows that the most successful core-package tiers are often priced at $150, $200, $250, or $300. Using prices that alternate between 0s and 5s (e.g., $150, $175, or $200) can make it easier for backers to compare tiers and choose.
"If your rewards are appealing but cost you more to deliver than the pledge amount, you haven’t raised capital; you’ve just taken on debt disguised as revenue." – FinancialModelsLab
Add Premium Tiers with Upsell Options
Premium tiers are designed for your most enthusiastic backers. For example, in a custom bag campaign, you could offer bundled packages or personalized upgrades, such as limited-edition colors or exclusive packaging. These options can increase average pledge amounts by over 35%. Price premium tiers in the $175 to $499 range, aiming for profit margins above 60%.
To offer exclusive deals to VIPs or returning backers without cluttering your public campaign page, use Kickstarter’s Secret Reward Tier feature. This allows you to share private links for special rewards, ensuring these tiers remain exclusive. By incorporating premium tiers, you can align your support levels with both production costs and profit goals.
Factor In Shipping and Fulfillment Costs
Shipping often sneaks up as a bigger expense than expected. Make sure your pricing fully covers getting your product from the manufacturer to your backers without eating into your profits.
"Shipping will almost certainly be more expensive than you think, and the costs increase every 6–12 months." – Russell Nohelty, USA Today–bestselling author and publisher
It’s also important to adjust your shipping strategy based on whether you’re delivering domestically or internationally.
Domestic vs. International Shipping
For U.S. orders, use tools like USPS, UPS, or FedEx calculators to get accurate quotes. Use your prototype’s actual weight and dimensions to avoid surprises. Keep in mind that custom bags, for example, are often subject to DIM (dimensional weight) charges. This means carriers might bill you based on the box’s size rather than its actual weight, especially if it’s large but lightweight.
With international orders, avoid flat fees and instead charge backers the actual shipping cost. Be upfront about whether backers will need to cover customs fees, VAT, and import duties. This clarity avoids disputes and protects your bottom line since international shipping can escalate quickly. To cushion against unexpected rate hikes between your campaign launch and fulfillment, include a 10–20% contingency buffer in your shipping budget.
Once you’ve nailed down carrier rates, don’t overlook how packaging choices can further affect your costs.
Packaging and Handling Costs
Shipping isn’t just about the product – it includes everything you use to pack it. Items like boxes, mailers, tape, and inserts all add weight and cost. For example, in a 2024 case study, a small weight increase from 1.7 ounces to 2.7 ounces for a 25,000-unit shipment caused carrier rates to jump from $0.34 to $0.52 per envelope – a 53% spike – boosting total fulfillment costs from $9,500 to $18,000.
Every little detail matters. Even shipping tape and bubble wrap contribute to your overall costs. Kickstarter also takes a cut – its 5% platform fee and 3–5% processing fee apply to your total funds, including shipping. For instance, if you charge $15 for shipping, about $1.20–$1.50 of that goes to fees before you even start buying materials. Be sure to include these fees in your per-unit shipping price from the very beginning.
Finalize Your Pricing and Test It Against the Market
After calculating your production and shipping costs, it’s time to lock in your pricing. The next steps focus on fine-tuning your strategy to align with market expectations and ensure your backers feel they’re getting value.
Apply the 4x Markup Rule
A straightforward approach is the 4x markup rule: double your Cost Per Unit (CPU) to set your wholesale price, then double the wholesale price to determine your MSRP. This ensures a solid margin while keeping pricing competitive.
"A good rule of thumb for a wholesale price is 2x the Cost Per Unit." – Matt Olick, Prelaunch Club
Here’s an example: if your unit cost is $40, your wholesale price would be $80, and your MSRP would land at $160. For your Kickstarter campaign, set reward tiers below MSRP. Early Bird tiers often fall 20–55% below MSRP, while the standard "Kickstarter Special" is typically 15–25% off. This gives you room to offer discounts that feel generous without cutting too deeply into your profits.
Confirm Each Tier Achieves at Least a 50% Profit Margin Using Pricing Calculators
For every reward tier, use tools like a COGS calculator or a Google Sheets model to confirm that each one maintains at least a 50% profit margin after all expenses.
"Make sure every reward tier has at least a 50 percent profit margin, which will help you recoup your project creation costs." – Russell Nohelty, USA Today–bestselling author
Don’t forget to factor in platform and payment processing fees. The Prelaunch Club’s COGS & Breakeven Calculator is a handy resource for modeling your costs and visualizing your profits per tier before launching.
| Cost Category | What to Include |
|---|---|
| Production | Materials, labor, customization, packaging |
| Shipping | Carrier rates, DIM weight, fulfillment center delivery |
| Administrative | Platform fee + payment processing fee |
| Contingency | 10–20% buffer for overruns or rate increases |
Once your numbers are solid, make sure the perceived value of your product aligns with what backers expect.
Get Feedback on Perceived Value
Crunching numbers only gets you so far – feedback from real people is essential. Before finalizing your pricing, test it with potential backers. Tools like Typeform surveys can gauge price sensitivity while involving your audience in the process. You can also try a $1 VIP deposit strategy to see if your base price and shipping costs resonate with your target audience.
"Consult with your friends and family extensively at every step of the way. Listen to your gut, but make sure you keep an open mind and focus on building something people want enough that they will pay for it." – Jason Spitkoski, Founder, Moxy & Zen
Interestingly, Kickstarter data shows that core-package prices of $150, $200, $250, and $300 tend to generate the highest campaign raises. If your product doesn’t naturally fit these price points, consider offering Kickstarter-exclusive add-ons or bundles to increase the average order value instead of inflating the base price.
Conclusion: Key Steps to Pricing Your Custom Bag for Kickstarter
Setting the right price for your custom bag on Kickstarter takes careful planning, from the initial prototype to the final shipment. Every choice – whether it’s about material costs or Early Bird discounts – plays a role in determining your campaign’s profitability.
Success isn’t just about how much money you raise; it’s about whether you can turn a profit.
Factor in Kickstarter’s 10% platform fee and a 10–20% contingency buffer for unexpected costs. Make sure every reward tier offers at least a 50% profit margin before you launch. These numbers are the foundation for a campaign that doesn’t just fund but thrives.
The process includes everything from calculating production costs to fine-tuning reward tiers and managing shipping logistics. Treat your budget as a flexible guide that evolves with your project.
"A budget is a living document that grows and changes as your project evolves. You don’t need to complete it on the first try." – Russell Nohelty, USA Today–bestselling author and publisher
If your costs increase, adjust the scope of your campaign before it goes live. Pricing your product accurately is the key to turning a funded campaign into a successfully fulfilled project. Every pricing decision should align with your production and fulfillment strategy to set the stage for a strong Kickstarter launch.
FAQs
How do I find my true per-bag cost?
To figure out the real cost per bag, make sure you account for all production expenses. These include materials (like nylon or polyester), labor, tariffs, tooling, shipping, and compliance fees. Once you have the total cost, divide it by the number of units produced. Then, add a margin to cover platform fees and ensure profit – shooting for a 40%-60% gross margin. This approach helps keep your pricing both competitive and profitable, especially for your Kickstarter campaign.
What if I don’t hit my manufacturer’s MOQ?
If you don’t meet your manufacturer’s MOQ (Minimum Order Quantity), you could end up paying more per unit. MOQs are designed to keep production efficient, so smaller orders can disrupt that balance. To navigate this, talk to your manufacturer about possible alternatives. They might offer solutions like smaller production runs, partial orders, or even pre-orders to help you manage.
By planning ahead and clearly discussing your needs, you can sidestep delays or surprise expenses, ensuring your Kickstarter campaign stays on course.
Should I charge shipping separately or include it?
Kickstarter gives you two ways to handle shipping costs: you can either bundle them into the product price or list them as a separate charge. Bundling makes pledging easier for backers since they see a single price upfront. On the other hand, charging shipping separately keeps things clear and helps prevent overestimating costs. The right choice depends on your campaign’s approach and how you want to communicate pricing to your backers.


 Mobile/What's App/Wechat
 E-Mail
 ADD
ADD


