Reducing the Stow It All Tote by 15% – By Karen Wetherall
Saturday, 29 October 2016

Hi Everyone,
Today I have a great little tutorial to share with you, written by my friend Karen, on reducing the Stow It All Tote by 15%! Over to you Karen:
————————————————————————–
Hi, my name is Karen and I live deep in rural England. I learnt to sew and embroider at school 48 odd years ago, and have never really stopped. I also like to do raw edge applique and free-motion machine embroidery. I like to play with all the wonderful new toys there are nowadays to make it all easier.

One of Karen's appliqued bags!

More of Karen's work!
Rather than start my own blog, I joined Sew-Whats-New.com and write posts about my sewn creations there (sew-whats-new.com/profile/KarenWetherall ), and also post pictures on my Flickr page (www.flickr.com/photos/auntystitches). I love making bags, and especially Christine’s designs as she gives so much detail which really helps me achieve a professional finish. I’ve learnt a lot from her.
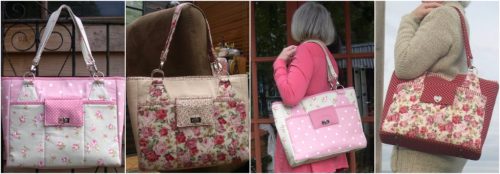
I have made 8 “Stow-it-All” bags so far, the first pink one for myself, then another one exactly the same for a friend. I made the cream and roses one for a MacMillan’s raffle prize. I refused to make a third exactly the same as the first pink one, so I moved the fabrics about and made the pink spotty one! Then I made myself a red one for winter.
My niece asked me if I could make one for her but scale it down in size as she is only 4 foot tall so I made her this one, which is 15% smaller. I only had one problem, when boxing the bottom I took the measurement from the corner straight down the seam instead of along the edge as per the instructions. Don’t do that!
Here you can see the difference in size between the two of them. It makes it more of a handbag, and less of a tote:
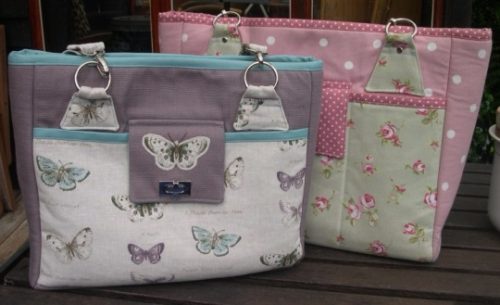

My sister liked the smaller size too so I made her one exactly the same as my winter red one but smaller, and again you can see the difference in size. Christine thought you might want to know how I did it, so now I am going to show you.
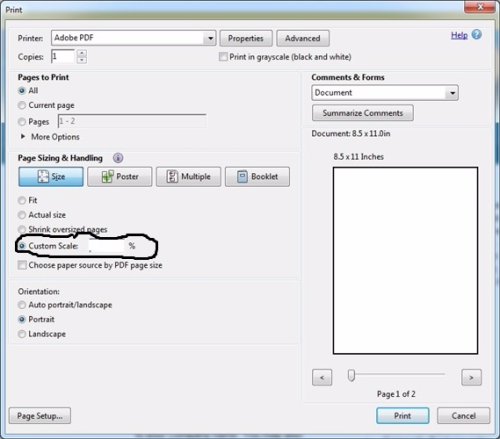
The first step is to print the pattern pieces in the reduced size. To reduce it by 15% you need to print it off at 85% instead of 100%. My print menu has a 'Custom Scale' box where I can punch in the size I need (see above). Alternatively you could print the full size pattern pieces, and then pop them back in your copier and ask it to reduce them.

*Mark all the pattern pieces clearly as 85%, or print them on coloured paper so you don’t mix them up with the full-size ones!
*Use the same seam allowance as for the original pattern, i.e. 10mm (3/8”)
When it comes to positioning (i.e. 2" from the top) you have to do a quick sum to reduce it. I switch from inches to metric if the maths is easier, both are on my ruler and tape measure after all. I jotted the alternative measurements/instructions in the margin of my instructions in red, but list them for you below as they occur.
6. MAKE THE EXTERIOR SLIP POCKETS

f) Mark the placement of your twist lock 1 5/8” down (instead of 2”) down from the bottom of the band of lining, on the centre crease that you just made.
m) Leave front pocket undivided; three sections would be tiny, and two wouldn't work with the twist lock in the middle. The twist lock will prevent the pocket gaping.

n) Divide the back pocket into two sections.
7. FLAP
b) Put the Flap exterior and Flap lining pieces RST and pin and stitch leaving an 8.5cm (3 3/8”) gap along the top for turning.
8. STRAP TABS
The seam line is marked on the pattern piece so you know where to start and finish sewing. I used the same measurements as for full sized strap tabs as the hardware I used was the same size.

13. MAKE INTERIOR ZIPPER POCKET
I use the full-sized zipped pocket pattern piece as the smaller one would only take a 6" zipper and that's too small for anything useful!
d) …. Centre and position it 9.2cm (3 5/8") down from the top of the Body Lining to the edge of the zipper pocket…..

14. MAKE INTERIOR SLIP POCKETS
g) Position your Interior Slip Pocket B 10.6cm (4 3/16") down from the top, centred side to side, and pin in place.
i) to j) Find centre of pocket and mark top and bottom. Measure 1.2cm (½”) out either side at the top and bottom and join the lines to form a 2.5cm (1”) pen pocket and divide the pocket in two.
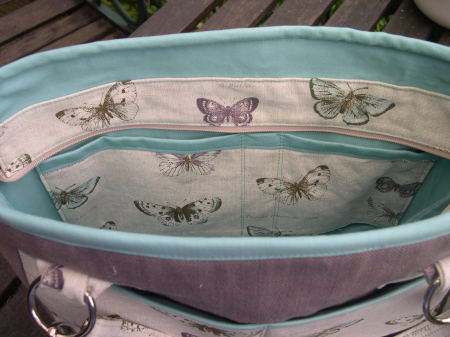
15. ZIPPER CLOSURE & ZIPPER TABS
e) Take your 48cm (19”) zipper or longer …. my zipper is 19” long with the zipper tabs fitted
p) … Pin in place 6cm (2 3/8") down from the raw edge…..
15. ASSEMBLE LINING
b) Pin and stitch the side seam leaving a 12.7cm (5”) turning gap on one side. Start the gap 6.3cm (2 ½”) from the top ……………..
f) Measure 6cm (2 3/8") from the corner point along each side and make a mark…..

That’s about all there is to it! Here is the last one I made, the Summer version for my sister. She wanted it exactly the same as the red Winter one but in blue. I never thought I would find blue roses, but what do you know!

——————————————————————————
Thanks for an awesome tutorial Karen! 🙂
You can find the Stow It All Tote in my pattern shop. or just grab it right now by clicking here!


|
Comments (2)
|
Comments
Reducing the Stow It All Tote by 15% – By Karen Wetherall

Hi Everyone,
Today I have a great little tutorial to share with you, written by my friend Karen, on reducing the Stow It All Tote by 15%! Over to you Karen:
————————————————————————–
Hi, my name is Karen and I live deep in rural England. I learnt to sew and embroider at school 48 odd years ago, and have never really stopped. I also like to do raw edge applique and free-motion machine embroidery. I like to play with all the wonderful new toys there are nowadays to make it all easier.

One of Karen's appliqued bags!

More of Karen's work!
Rather than start my own blog, I joined Sew-Whats-New.com and write posts about my sewn creations there (sew-whats-new.com/profile/KarenWetherall ), and also post pictures on my Flickr page (www.flickr.com/photos/auntystitches). I love making bags, and especially Christine’s designs as she gives so much detail which really helps me achieve a professional finish. I’ve learnt a lot from her.

I have made 8 “Stow-it-All” bags so far, the first pink one for myself, then another one exactly the same for a friend. I made the cream and roses one for a MacMillan’s raffle prize. I refused to make a third exactly the same as the first pink one, so I moved the fabrics about and made the pink spotty one! Then I made myself a red one for winter.
My niece asked me if I could make one for her but scale it down in size as she is only 4 foot tall so I made her this one, which is 15% smaller. I only had one problem, when boxing the bottom I took the measurement from the corner straight down the seam instead of along the edge as per the instructions. Don’t do that!
Here you can see the difference in size between the two of them. It makes it more of a handbag, and less of a tote:


My sister liked the smaller size too so I made her one exactly the same as my winter red one but smaller, and again you can see the difference in size. Christine thought you might want to know how I did it, so now I am going to show you.

The first step is to print the pattern pieces in the reduced size. To reduce it by 15% you need to print it off at 85% instead of 100%. My print menu has a 'Custom Scale' box where I can punch in the size I need (see above). Alternatively you could print the full size pattern pieces, and then pop them back in your copier and ask it to reduce them.

*Mark all the pattern pieces clearly as 85%, or print them on coloured paper so you don’t mix them up with the full-size ones!
*Use the same seam allowance as for the original pattern, i.e. 10mm (3/8”)

When it comes to positioning (i.e. 2" from the top) you have to do a quick sum to reduce it. I switch from inches to metric if the maths is easier, both are on my ruler and tape measure after all. I jotted the alternative measurements/instructions in the margin of my instructions in red, but list them for you below as they occur.
6. MAKE THE EXTERIOR SLIP POCKETS

f) Mark the placement of your twist lock 1 5/8” down (instead of 2”) down from the bottom of the band of lining, on the centre crease that you just made.
m) Leave front pocket undivided; three sections would be tiny, and two wouldn't work with the twist lock in the middle. The twist lock will prevent the pocket gaping.

n) Divide the back pocket into two sections.
7. FLAP
b) Put the Flap exterior and Flap lining pieces RST and pin and stitch leaving an 8.5cm (3 3/8”) gap along the top for turning.
8. STRAP TABS
The seam line is marked on the pattern piece so you know where to start and finish sewing. I used the same measurements as for full sized strap tabs as the hardware I used was the same size.

13. MAKE INTERIOR ZIPPER POCKET
I use the full-sized zipped pocket pattern piece as the smaller one would only take a 6" zipper and that's too small for anything useful!
d) …. Centre and position it 9.2cm (3 5/8") down from the top of the Body Lining to the edge of the zipper pocket…..

14. MAKE INTERIOR SLIP POCKETS
g) Position your Interior Slip Pocket B 10.6cm (4 3/16") down from the top, centred side to side, and pin in place.
i) to j) Find centre of pocket and mark top and bottom. Measure 1.2cm (½”) out either side at the top and bottom and join the lines to form a 2.5cm (1”) pen pocket and divide the pocket in two.

15. ZIPPER CLOSURE & ZIPPER TABS
e) Take your 48cm (19”) zipper or longer …. my zipper is 19” long with the zipper tabs fitted
p) … Pin in place 6cm (2 3/8") down from the raw edge…..
15. ASSEMBLE LINING
b) Pin and stitch the side seam leaving a 12.7cm (5”) turning gap on one side. Start the gap 6.3cm (2 ½”) from the top ……………..
f) Measure 6cm (2 3/8") from the corner point along each side and make a mark…..

That’s about all there is to it! Here is the last one I made, the Summer version for my sister. She wanted it exactly the same as the red Winter one but in blue. I never thought I would find blue roses, but what do you know!

——————————————————————————
Thanks for an awesome tutorial Karen! 🙂
You can find the Stow It All Tote in my pattern shop. or just grab it right now by clicking here!


View the entire comment thread.
Please enable JavaScript if you would like to comment on this blog.
Welcome!
- Don’t you just LOVE handbags? I know I do and I am TOTALLY addicted to making them! Imagine being able to make handbags and purses that are unique to YOU and exactly the style, colour, size and shape that YOU want them to be? ChrisW Designs range of designer bag patterns will help you to do just that! Nobody will believe you made them yourself!

Search


.sidebar-slider-sew_alongs .bx-viewport { border: 0 !important; background: transparent !important; }
.sidebar-slider-sew_alongs .bx-viewport img { margin: 0 !important; }
.sidebar-slider-sew_alongs .bx-controls { margin-top: -10px !important; }
.sidebar-slider-sew_alongs li:not(:first-of-type) { display: none; }
Sew Alongs
@chriswdesigns
.sidebar-slider-bag_making_tutorials .bx-viewport { border: 0 !important; background: transparent !important; }
.sidebar-slider-bag_making_tutorials .bx-viewport img { margin: 0 !important; }
.sidebar-slider-bag_making_tutorials .bx-controls { margin-top: -10px !important; }
.sidebar-slider-bag_making_tutorials li:not(:first-of-type) { display: none; }
Tutorials
.sidebar-slider-guest_posts .bx-viewport { border: 0 !important; background: transparent !important; }
.sidebar-slider-guest_posts .bx-viewport img { margin: 0 !important; }
.sidebar-slider-guest_posts .bx-controls { margin-top: -10px !important; }
.sidebar-slider-guest_posts li:not(:first-of-type) { display: none; }
Popular Posts
Categories
- Bag Making Resources
- Bag Making Tips
- Bag Making Tutorials
- Bag Naming Competitions!
- Bag Photos
- Blank Slate Sketches
- Blog Hops
- ChrisW Designs Bag Sewing Video Tutorials
- ChrisW Designs Patterns
- Competitions
- Easy Street Patterns
- Featured
- Free Patterns
- Fundamentals
- Giveaways!
- Guest Posts
- In the Press
- Inspirational Bags
- Minimise to Maximise
- My Ramblings
- My Studio
- NEW Patterns
- News
- Pattern Hacks
- Pattern Info!
- Ready Made Bags
- Revised Patterns
- Sales!
- Sew Alongs
- Sewing Machine Reviews
- Sewing Spaces
- Sewist Interviews
- Sponsored Posts
- Strap Series
- The Art of Bag Making
- Tools of the Trade!
- Website ChitChat
- Zipper 101
Visit Christine Welsh’s profile on Pinterest.
Junyuan Bags | Professional Bag Manufacturer
Ten articles before and after
Sewing With Cork – by Toni of The Little British Fabric Shop – ChrisW Designs
The Art of Bag Making – Personalized Gizmo Garage – ChrisW Designs
The Kiss Clutch made with Quilt As You Go (QAYG) techniques – ChrisW Designs
Creating Fabric Using Color Weaving – With Dianna Leckner!
How to Sew a Fabric Tab End on a Zipper!


 Mobile/What's App/Wechat
 E-Mail
 ADD
ADD


