Creating Fabric Using Color Weaving – With Dianna Leckner!
Wednesday, 28 October 2015
Do you know, it never ceases to amaze me the amount of gorgeous creations being shared in our Facebook group….Honestly, the creativity and workmanship these ladies display is second to none! So it is of no surprise really that one of the members, Dianna, shared with us a GORGEOUS Genevieve. BUT….her Genevieve was extra special! It had the most beautiful flap you ever did see! AND, she made it herself!
Well….Today I have something special to share with you! Dianna has graciously written a tutorial to share her process with us……so…….without further prattle from me….it is over to you Dianna….share away!
———————————————————————————————-
Creating Fabric Using Color Weaving

A Tutorial by Dianna Leckner

Thank you to Christine for the invitation to do this tutorial on making fabric for her Genevieve bags using a process I’m calling “Color Weaving.” I work full time, so the only blogging I get to do is reading the great blogs of other people! The flap for the Genevieve pattern can be cut out of a 17” square, but I suggest making an 18” square of color woven fabric to ensure you have ample room when deciding where to place your pattern piece for cutting. You will actually end up with enough pieces of color woven fabric to create two 18” squares that will be very similar, though not identical.
Materials Needed:
- Four coordinating or complementary fabrics, pre-shrunk, squared-up, and cut into 18” squares. I suggest good quality quilting cotton in similar weights. Good quality fat quarters will work as well.
- 18” square medium-weight fusible interfacing. My favorite is Pellon 931TD
- A coordinating or complementary color high sheen embroidery thread. My favorite is Sulky Rayon, but I have had good luck with some of the polyesters, too.
- A pattern for the Genevieve bag from ChrisW Designs
Tools Needed:
- Sewing machine capable of sewing a 5mm satin stitch
- Rotary cutter
- Self-healing cutting mat. Mine is 24” by 36”
- Acrylic quilter’s ruler. Mine is a 5” x 24”
- One 20” x 30” foam core board; OR a piece of corrugated cardboard with a smooth outer surface about 30 inches square (used during the weaving process)
- Iron and ironing board
- A pencil with a good, clean eraser
- Misc. sewing supplies such as scissors or thread snips, and long pins
- Regular ruler
- Writing pen or fabric marker that will be visible on your fabric
Optional Tools:
- Double thickness Insul-Bright® insulated lining
- Double thickness heavy canvas
I layer the Insul-Bright® and the canvas over the top of my foam core board to create a work space where I can both weave the fabric together and fuse the interfacing to the back of it without moving my work and risking knocking it out of kilter. This can also be done on an ironing board or other surface appropriate for pressing, but the surface must be large enough to accommodate the square of fabric you need to create. Despite the use of the Insul-Bright®, this method heats the foam core board to the point that it warps a bit, but I have had good results with it and have not melted the board. We will call this our “pressing surface” going forward. I have also done the same thing with a square piece of corrugated cardboard with a smooth surface.
Instructions:
Special instructions ONLY IF YOU ARE MAKING THE FULL FLAP VERSION OF THE GENEVIEVE BAG:
If you are making the non-piped, full flap version of the bag, there are some extra steps you need to take in printing and assembling the flap pattern pieces. No such special steps are required if you are making the shaped, non-piped flap. Bear in mind that the Genevieve pattern’s option for either of the piped flaps, which are made in sections, is not appropriate for the color woven fabric.
The assembled full flap pattern piece in the original Genevieve pattern is designed to be placed on the fold of your flap fabric before cutting. For best results with the color woven fabric, you will need to create a full size pattern piece, and you will NOT place it on the fold. Instead you will lay out the pattern piece you’ll make in this step right on top of the fabric you’re about to create before cutting it out.
Print the “Regular Flap – Top Half” and the “Regular Flap – Bottom half” on pages 58 and 59 of the Genevieve pattern. (I used card stock.) Before cutting out the pieces, draw a 12mm (½”) wide tab (seen in red in the photos) on the right hand edge of a bottom half piece, and another 12mm (½”) wide tab on the right hand edge of a top half piece. These tabs are similar to the tabs already present on the pattern pieces.
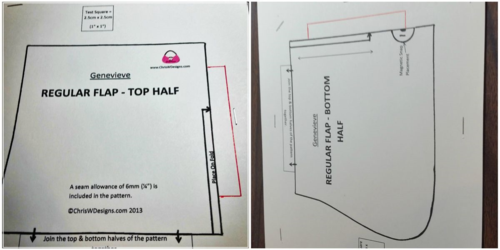
Place the bottom half piece (which you just altered with a newly drawn tab) on top of a blank piece of card stock and staple, staying well outside the lines of the pattern, or tape the two pages together. This will help keep the card stock from shifting as you cut out the pattern piece. Cut the bottom half pattern piece out of both thicknesses of your cardstock, being careful to preserve the tab you drew.
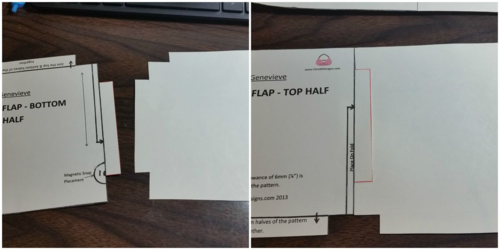
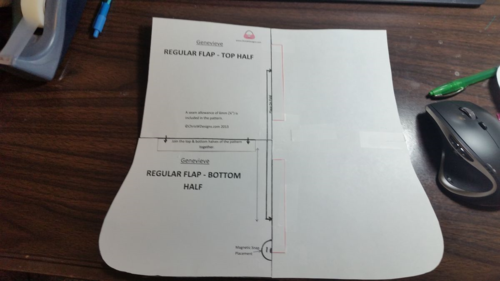
This will result in two identically shaped pieces, one of which will be blank. Flip the blank piece over side-to-side so that the new tabs face each other. Placed the blank tab below the tab you drew, line up the top, bottom, and center edges of the pattern piece, and tape together as shown. Repeat this process for the top half of the pattern piece. Finally, assemble the top half and the bottom half, being careful to overlap the tabs and line up the edges. The result is a full size pattern piece for the Genevieve flap! Set the pattern piece aside until you are ready to cut out your flap.
Creating the Color Woven Fabric
A word about planning your fabric layout –
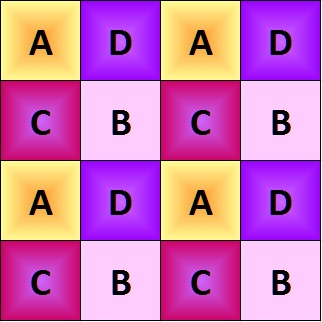
I am no expert on color theory; I’m a banker who likes to sew. As I have done this technique I have had some hits and some misses, and it took some practice to understand where my colors were going to appear in the finished product. No matter what colors you choose, the key to a beautiful result lies in the order in which you stack your fabrics before you cut the strips, or “Threads” you’ll weave together. You want to have control of the finished design, and to do that you need to know where your colors will land in what is essentially a grid of color panes. To complicate matters, you will be working with your fabrics RIGHT SIDE DOWN throughout the process. In the illustration below there are four colors, A through D. Two of the colors, A and B, will become the warp, or lengthwise Threads in your fabric, and colors C and D will become the weft (sometimes called woof), or horizontal Threads. To achieve the look below you will cut your warp Threads, the A and B colors, at the same time. Following that, you will cut your weft Threads, the C and D colors, also at the same time. D will then sit to the right of A, and C will appear below A. Plan carefully and choose your colors wisely! No matter what color your A fabric is, if you want your B fabric to appear diagonally across from it, cut those two colors at the same time. The same thing is true for the C and D colors.
Now the fun begins!
1. After selecting your fabrics, hereafter referred to as colors A through D, preshrink and press them in preparation for squaring-up and cutting the squares. I won’t cover techniques for squaring-up, but it is important that you begin your project with 18” squares cut on the straight grain of the fabric, which will minimize the stretch and distortion you could experience when you do the satin stitching later.
2. Next, prepare the pressing surface you’ll use for weaving and for fusing the fabrics. For me, this is a ½” thick foam core board, or a 30” square of corrugated cardboard on which I layer two thicknesses of Insul-Bright® insulated lining and then two layers of heavy canvas. If you already have a pressing surface that is large enough to accommodate the entire 18” square, and which will allow you to pin the Threads to it, you will want to use that.
3. Lay out your fabrics one at a time on your cutting mat, and, using your rotary cutter and your quilter’s ruler, cut each of them individually into 18” squares following the straight grain of the fabric. Turn all of your fabric RIGHT SIDE DOWN. 
4. To create your color woven fabric square, you will only need eight warp Threads and eight weft Threads, but this process will actually produce 16 of each, which will give you enough to make two color woven squares. I call them “fraternal twins” because they will look very much alike, but they won’t be identical. To cut your warp Threads, place your color B square RIGHT SIDE DOWN on your cutting mat, ensuring that it is oriented along vertical and horizontal lines on the mat, and smooth out any wrinkles.
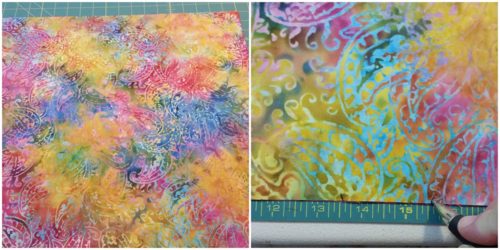
 5. Next, place your color A square RIGHT SIDE DOWN, directly on top of color B, matching all the fabric edges and smoothing out any wrinkles. Color A in this photo is a batik, so it doesn’t look RIGHT SIDE DOWN, but I assure you, it is! Once you are sure your color squares line up, you will mark the lower edge of the uppermost color fabric with a small mark at about the center line, using a regular pen or other marking device that will show on your fabric. Also make three more marks at any interval you choose, between the center mark and the right edge of the square. Repeat on the left side making three marks between the center mark and the left edge. These marks will be your starting points for the seven cuts you are about to make. They do not need to be equidistant, but you probably should not leave more than three inches between any two marks.
A note about cutting your Threads –
You are cutting two layers of fabric at a time, and each cut you make absolutely must be identical in both the top and bottom layers. The cool factor in the finished product is in the sinuous cuts you make, but if the top and bottom layers are not cut identically, you will not be able to do your weaving successfully. As you make your cuts, go slow and vary the width of your Threads as you go, but don’t make any part of a Thread narrower than one inch. This will leave enough width for the color to show on top of the design, and for the satin stitching between the panes not to be too crowded. Cut curves, not angles, because angles are very difficult to sew over smoothly with your satin stitch. Some of your strips can and should be wider than others.
6. Beginning at the furthest mark to the right, place your rotary cutter on the mark you made and begin to make a sinuous cut. Hold down the bottom edge of the fabrics with the fingers of your non-cutting hand to keep them from slipping out of place and distorting the cut on the lower layer, (color B). Cut from the bottom edge of the stacked fabric to, and through, the top edge. You can start out straight or at any gentle angle you like, but don’t be too extreme, and remember to cut curves, not angles. Slide your newly cut Threads to the right as you go.
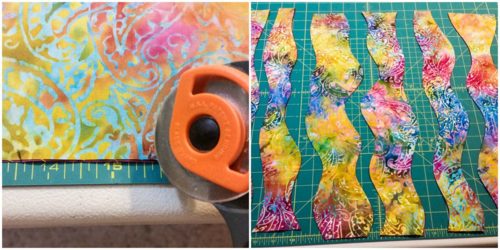
7. Repeat the process six more times, beginning at the marks you made in the lower edge of your fabric square, sliding the resulting Threads out of the way to the right each time, being careful to keep them in the same order they were cut. When finished, you will have eight Threads of color A, and eight Threads of color B stacked on top of each other. In your head, think of each stack as numbered 1 through 8 beginning at the left-most stack.
Remember, for this tutorial, you will have eight “leftover” warp Threads, and eight “leftover” weft Threads which can be used later to make up a bonus piece of coordinating fabric. Steps eight through thirteen cover how to remove the leftovers in such a way as to preserve their order so they can easily be used later, AND how to begin laying out the warp threads on your pressing surface for weaving.
8. When finished cutting your warp Threads, begin at Thread stack #1 and remove the top layer – the first color A Thread, (now a leftover), and set it aside, keeping it RIGHT SIDE DOWN. (You will stack the remaining leftover Threads on it as you go, in the exact order they were cut, RIGHT SIDE DOWN, to facilitate the creation of that bonus piece of fabric.)
9. Pick up the remaining Thread (color B) from stack #1 and move it to the pressing surface you have prepared. Set it lengthwise and RIGHT SIDE DOWN (straight edge to the left) on your pressing surface, and use two pins to secure it at the top edge through the canvas and the Insul-Bright®, and into the foam core board/cardboard.
10. Return to the Thread stacks and pick up the color A Thread from the top of stack #2 and move it to your surface. Place it lengthwise and to the right of your first Thread, RIGHT SIDE DOWN, matching the curves and keeping the top and bottom edges lined up straight. Again, pin it to the surface. This is a little like putting together a jigsaw puzzle. Each Thread will fit precisely into the curves of the Thread before it, colors alternating.
11. Return to stack #2 and place the color B Thread that remains there (now a leftover), RIGHT SIDE DOWN on top of the leftover color A Thread. Then, from stack #3, pick up the color A Thread, (now a leftover) and also move it to the top of the leftover stack, keeping it RIGHT SIDE DOWN. This careful placement of the leftover Threads may seem tedious and unnecessary, but you will thank me when you go to put together your bonus piece of fabric!
12. Stack #3 now has a color B Thread in it, which you will move to the pressing surface and repeat the process of fitting it precisely next to the Thread before it, RIGHT SIDE DOWN, matching curves, lining up edges, and pinning to the surface.
13. Repeat this process with the remaining stacks of colors, alternating the A and B Threads until you have created a square of alternating colors on your pressing surface that is 18” square. (Once all of your leftover warp Threads are cut and stacked, pin them together and move them away from the cutting mat.)
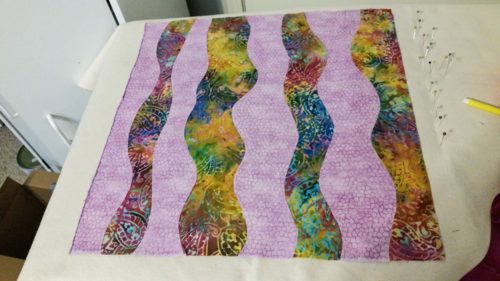
14. Using the clean eraser end of your pencil, carefully nudge any curves or edges that are out of alignment until all of the curves fit snugly, the edges are even, and your square looks like, well – a square! Pin the bottom edge of each Thread to the foam core board/cardboard to keep the Threads straight.
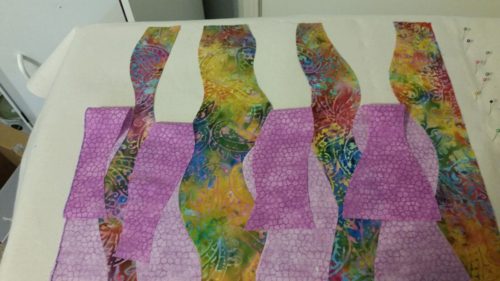
15. Next, unpin the top edges of all eight Threads on your pressing surface. Carefully peel back only the color B Threads by four to five inches, exposing the canvas beneath, without disturbing the alignment of the Threads too much. This will allow you to place your first weft Thread and begin your weaving.
16. To cut your weft Threads, place your color D square RIGHT SIDE DOWN on your cutting mat, ensuring that it is oriented along vertical and horizontal lines on the mat, and smooth out any wrinkles.
17. Next, place your color C square RIGHT SIDE DOWN, directly on top of color D, once again matching all the fabric edges and smoothing out any wrinkles as in step 5. Repeat the remainder of step 5, and all of steps 6 and 7 for colors C and D. The Threads you cut in C and D will be different than those you cut earlier, and they should be!
18. When finished cutting your weft Threads, begin at the left-most Thread stack, (stack #1), and remove the top layer – the first color C Thread, (now a leftover), and set it aside, RIGHT SIDE DOWN. You will stack the remaining leftover Threads on it in the exact order they were cut, RIGHT SIDE DOWN, again, to facilitate the creation of that bonus piece of fabric.
19. Pick up the color D Thread from stack #1 and move it to the pressing surface, rotating it clockwise 90 degrees.
20. Place your color D Thread crosswise, RIGHT SIDE DOWN (straight edge along the top), over the top of the four color A Threads, lining up the straight edge with the top edge of the square you created on your pressing surface. Pin it down on top of each of the four color A Threads.
21. Carefully roll up the color B Threads and pin the top edge of the Threads to the foam core board/cardboard through the color D Thread you just placed. Your square should now have sixteen pins across the top.
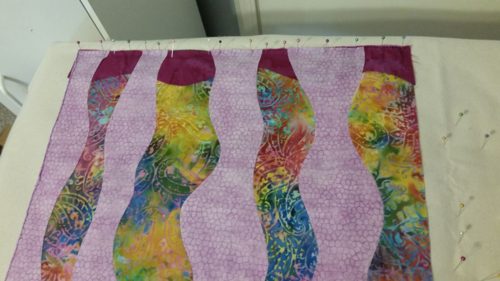
22. At the bottom of your square, unpin all of the color A Threads and lay them up and over the crosswise color D Thread to make room for the next weft Thread.
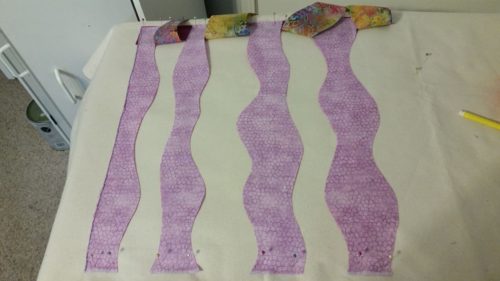
23. Return to the Thread stacks and pick up the color C Thread from the top of stack #2 and move it to your pressing surface. Again, rotate it 90 degrees to the right and place it crosswise and below the color D Thread, RIGHT SIDE DOWN. This is a little challenging as the Thread above it will be distorted by the warp Threads lying over the top. Carefully pull the color A Threads back to their original places, matching the curves and keeping all straight edges aligned.
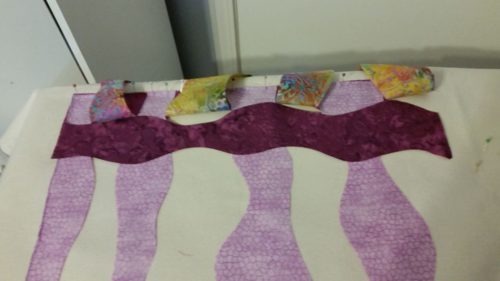
24. Use your pencil eraser to nudge the intersections of the Threads so all lines meet with no gaps.
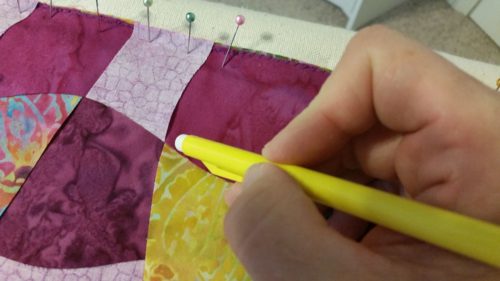
25. Transfer the pins from the bottom of the color B Threads to the bottom of the color A Threads, and move the B Threads up and over the crosswise color C Thread to make room for the next weft Thread.
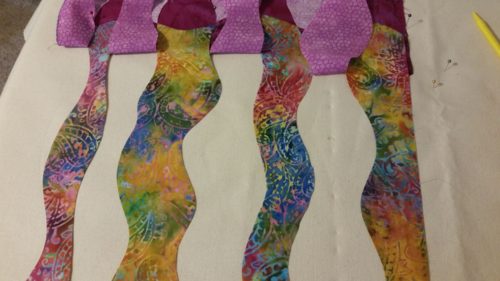
26. Return to stack #2 and place the color D Thread that remains there (now a leftover), RIGHT SIDE DOWN on top of the leftover color C Thread. Then, from stack #3, pick up the color C Thread, (now a leftover) and also move it to the top of the leftover stack, keeping it RIGHT SIDE DOWN.
27. Stack #3 now has a color D Thread in it, which you will move to the pressing surface and repeat the process of fitting it precisely below the Thread before it, RIGHT SIDE DOWN, matching curves, lining up edges, and pinning to the surface.
28. Repeat this process with the remaining stacks of colors, alternating the C and D Threads until you have created a woven grid of alternating colors on your pressing surface that is 18” square.
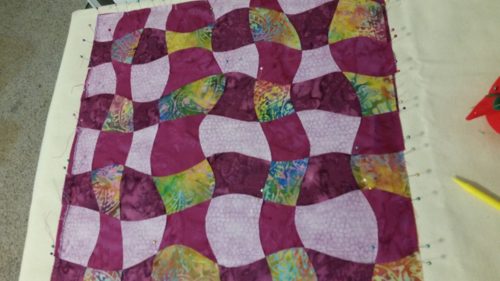
29. Once all of your leftover weft Threads are cut and stacked, pin them together and move them away from the cutting mat.
30. When all of the Threads are in place on your pressing surface. Check each and every intersection of Threads and use your eraser to nudge them into alignment. This step is vital so you don’t have gaps when you are doing the satin stitch. Place as many pins as you need through the fabric and into the pressing surface as you move over the square to ensure everything stays in alignment while you adjust the remaining Threads. When you’re finished weaving, make sure there are at least two pins at each end of every Thread all the way around the outside edge. You are now ready to remove all pins in the interior of your square, leaving the ones on the perimeter in place.
31. When you are satisfied that all of your intersections are aligned with no gaps, center your 18” square of fusible interfacing on your fabric square, fusible side down. You may be tempted to remove your pins, but don’t do that just yet. Following the manufacturer’s directions, and beginning in the center, fuse the interfacing to the wrong side of your square. Work from the center out to the edges, holding the iron steady as you fuse each area. Do not move the iron as you fuse; pick it up and move it from a fused area to a non-fused area so as not to dislodge the fabric edges as you go. When you reach the outside edges of your square, remove enough pins to allow you to fuse a few inches at a time, leaving the remaining pins in place until you are ready to move the iron to the next area. You can use a pressing cloth for this step (31) if you like. Make sure all of the interfacing is properly fused over the entire area of your color woven square. At this point you will have removed all of your pins.
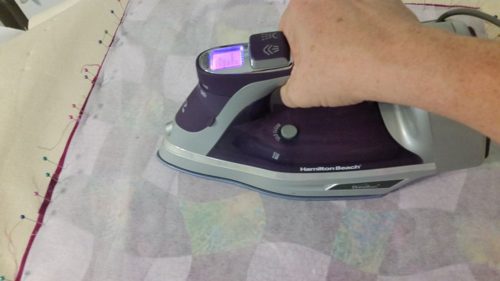
Now it’s time for your first reveal! Turn your fabric square over and feast your eyes on the right side of your handiwork for the first time! It’s ordinarily a surprise because the front side always looks amazing compared to the back side, which you’ve been looking at the whole time!
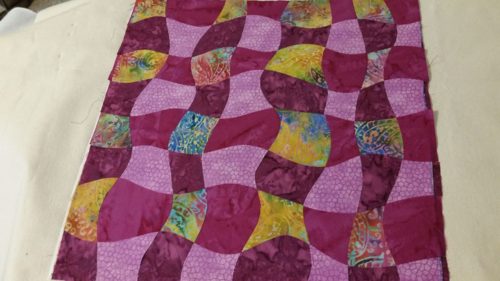
Stretch and distortion are your enemies in this project, so the next steps are imperative for a good result. You’ve done the meticulous weaving of your lovely fabric, being careful to keep everything in perfect alignment, and because you fused everything together, it seems like your Threads should stay obediently in place. However, because you have two layers of fabric, and only every other pane is fused to the interfacing, you will have 32 panes that are fused to exactly nothing, including two dozen with completely loose ends! When I did my first project, I didn’t follow these vital next steps, and the result was a mess!
So – now we stabilize!
32. Pin all the edges of your Threads in place around the perimeter of your square. Move your fabric square to your sewing machine and sew a wide (5mm) zig-zag stitch all the way around the outside, securing all loose ends. My machine will do a nice running zig-zag stitch, so I use that for extra stability.

33. Next, you need to secure all of the Thread edges to ensure that they won’t bunch up as you are applying the satin stitch. Set your machine for a very narrow (1mm to 1.25mm), plain, zig-zag at about 1.5mm stitch length. Beginning at the top edge of the line between your two right-most Threads, stitch along the line, keeping it in the center of your presser foot so that both Threads are caught in the stitching. It is more important to catch the edge of the exposed thread than the one below it, so if you get off center, you only need to go back and re-stitch if the uppermost thread is not tacked down. Repeat this stabilizing stitch for every line between all of your Threads. Repeat for the lines running perpendicular to the first set. Now you are ready to apply your satin stitch!

And finally, we apply that gorgeous satin stitch!
34. Wind a bobbin and thread your machine with your high sheen embroidery thread. I have had good results with both rayon and with polyester. Make sure you have a full bobbin. My machine has a large capacity bobbin that holds enough thread to do an entire square, but if your bobbin does not have a large capacity, you will want to check it often so you don’t run out in the middle of a line.
35. Set your machine for a wide (5mm) zig-zag with a short stitch length. I set mine for .25mm. Practice your satin stitch on scrap fabric that approximates the same thickness of fabrics as your square to make sure you are happy with the result. Once you’re satisfied with the stitch, you’re ready to rumble!
36. Again, beginning at the top edge of the line between your two right-most warp Threads, secure your stitch and then stitch along the line you zig-zagged, keeping the line in the center of your presser foot. Most zig-zag presser feet have a center marking, which makes it easy to follow the line. Since the stitch is so short, satin stitching these lines is a slow process, but that’s to your advantage because it makes it easier to follow curves and keep the stitch centered across the line. When you reach the bottom of your line, secure the stitches again, cut your threads, and return to the top of the square to do your second line. Avoid turning the fabric 180 degrees and sewing back the opposite direction because depending on your thread, it could cause the appearance of every other line to be slightly different.

37. Stitch each of your seven lines between the warp Threads before pivoting your fabric 90 degrees to stitch the lines between the weft Threads.

Here’s your second big reveal! Your color woven fabric square is now complete and is ready to be used in the project of your choice.

After you cut out whatever shape you are doing, be absolutely certain to zig-zag all the way around the outside edge with a fairly short stitch to help keep the satin stitching from unravelling. When you are going to zig-zag over the end of a line of satin stitches, sew over it, reverse your stitch and sew over it backwards, then sew over it again going forward before continuing around the shape.

Remember that you have a whole other complete set of Threads that you can use to weave and stitch another beautiful square. Bear in mind that the Genevieve pattern’s option for either of the piped flaps, which are made in sections, is not appropriate for the color woven fabric. Steps 38 through 40 address using the Genevieve pattern piece assembled at the beginning of this tutorial for cutting out a flap.
38. If you are cutting a flap, either full or shaped, for the ChrisW Designs “Genevieve,” you can place the pattern piece in such a way as to feature elements of the woven fabric that you like. Because the satin stitching will minimize stretching, you can even place the flap on the bias. If you do choose to place the pattern piece on the bias, place your quilters ruler across the fabric and the pattern piece with one edge of the ruler covering the square from corner to corner. Line up the original fold line down the center of your pattern piece with the edge of the ruler.

39. Pinning the pattern piece to the color woven square and cutting out the shape can distort the result because of the satin stitching and the fabric layers. I print my patterns on card stock, so I always use just a few pins to keep the pattern piece stable, but then I use a fabric marking pen to draw the outline of the shape directly on the fabric before cutting it out. When I cut my actual flap out of this, I didn’t do it on the bias because I wanted to feature a couple of the batik panes.

40. Remember, once you have cut out your flap, zig-zag all the way around the outside edge with a fairly short stitch to help keep the satin stitching from unravelling. When you are going to zig-zag over the end of a line of satin stitches, sew over it, reverse your stitch and sew over it backwards, then sew over it again going forward before continuing around the shape.

Here is a shot of the bag in progress with the flap installed.

The possibilities are endless with this technique. You could increase or even vary the number of warp and weft Threads; you could either hand or machine embroider designs in the panes; you could cut and weave only two colors (someone gave me an idea for making a flap in black and white to look like a checkered flag use in car racing!); or you could even use a variegated thread for the satin stitch. I am excited to find out what Christine’s talented readers will do with this!
Thank you again for the opportunity to make a contribution to this community!

———————————————————————————–
Thank you so much for sharing your fantastic technique with us Dianna! It is amazing and I can't wait until I have some time to try this myself!
Now I hope to see a lot more Genevieve's with awesome flaps showing up to impress us! Of course, you can adapt this technique to use on just about any bag you like! Please DO let us know if you give it a whirl! Pop along and share in our Facebook Group so Dianna can see her technique in action….or pop them in our Flickr Pool….Use the hashtag #genevieve to share on instagram too!…..or even email them to me! It's all good! 🙂
Need to grab a copy of Genevieve? You can get it HERE!


|
Comments (25)
|
Comments
Creating Fabric Using Color Weaving – With Dianna Leckner!
Do you know, it never ceases to amaze me the amount of gorgeous creations being shared in our Facebook group….Honestly, the creativity and workmanship these ladies display is second to none! So it is of no surprise really that one of the members, Dianna, shared with us a GORGEOUS Genevieve. BUT….her Genevieve was extra special! It had the most beautiful flap you ever did see! AND, she made it herself!
Well….Today I have something special to share with you! Dianna has graciously written a tutorial to share her process with us……so…….without further prattle from me….it is over to you Dianna….share away!
———————————————————————————————-
Creating Fabric Using Color Weaving

A Tutorial by Dianna Leckner

Thank you to Christine for the invitation to do this tutorial on making fabric for her Genevieve bags using a process I’m calling “Color Weaving.” I work full time, so the only blogging I get to do is reading the great blogs of other people! The flap for the Genevieve pattern can be cut out of a 17” square, but I suggest making an 18” square of color woven fabric to ensure you have ample room when deciding where to place your pattern piece for cutting. You will actually end up with enough pieces of color woven fabric to create two 18” squares that will be very similar, though not identical.
Materials Needed:
- Four coordinating or complementary fabrics, pre-shrunk, squared-up, and cut into 18” squares. I suggest good quality quilting cotton in similar weights. Good quality fat quarters will work as well.
- 18” square medium-weight fusible interfacing. My favorite is Pellon 931TD
- A coordinating or complementary color high sheen embroidery thread. My favorite is Sulky Rayon, but I have had good luck with some of the polyesters, too.
- A pattern for the Genevieve bag from ChrisW Designs
Tools Needed:
- Sewing machine capable of sewing a 5mm satin stitch
- Rotary cutter
- Self-healing cutting mat. Mine is 24” by 36”
- Acrylic quilter’s ruler. Mine is a 5” x 24”
- One 20” x 30” foam core board; OR a piece of corrugated cardboard with a smooth outer surface about 30 inches square (used during the weaving process)
- Iron and ironing board
- A pencil with a good, clean eraser
- Misc. sewing supplies such as scissors or thread snips, and long pins
- Regular ruler
- Writing pen or fabric marker that will be visible on your fabric
Optional Tools:
- Double thickness Insul-Bright® insulated lining
- Double thickness heavy canvas
I layer the Insul-Bright® and the canvas over the top of my foam core board to create a work space where I can both weave the fabric together and fuse the interfacing to the back of it without moving my work and risking knocking it out of kilter. This can also be done on an ironing board or other surface appropriate for pressing, but the surface must be large enough to accommodate the square of fabric you need to create. Despite the use of the Insul-Bright®, this method heats the foam core board to the point that it warps a bit, but I have had good results with it and have not melted the board. We will call this our “pressing surface” going forward. I have also done the same thing with a square piece of corrugated cardboard with a smooth surface.
Instructions:
Special instructions ONLY IF YOU ARE MAKING THE FULL FLAP VERSION OF THE GENEVIEVE BAG:
If you are making the non-piped, full flap version of the bag, there are some extra steps you need to take in printing and assembling the flap pattern pieces. No such special steps are required if you are making the shaped, non-piped flap. Bear in mind that the Genevieve pattern’s option for either of the piped flaps, which are made in sections, is not appropriate for the color woven fabric.
The assembled full flap pattern piece in the original Genevieve pattern is designed to be placed on the fold of your flap fabric before cutting. For best results with the color woven fabric, you will need to create a full size pattern piece, and you will NOT place it on the fold. Instead you will lay out the pattern piece you’ll make in this step right on top of the fabric you’re about to create before cutting it out.
Print the “Regular Flap – Top Half” and the “Regular Flap – Bottom half” on pages 58 and 59 of the Genevieve pattern. (I used card stock.) Before cutting out the pieces, draw a 12mm (½”) wide tab (seen in red in the photos) on the right hand edge of a bottom half piece, and another 12mm (½”) wide tab on the right hand edge of a top half piece. These tabs are similar to the tabs already present on the pattern pieces.

Place the bottom half piece (which you just altered with a newly drawn tab) on top of a blank piece of card stock and staple, staying well outside the lines of the pattern, or tape the two pages together. This will help keep the card stock from shifting as you cut out the pattern piece. Cut the bottom half pattern piece out of both thicknesses of your cardstock, being careful to preserve the tab you drew.
This will result in two identically shaped pieces, one of which will be blank. Flip the blank piece over side-to-side so that the new tabs face each other. Placed the blank tab below the tab you drew, line up the top, bottom, and center edges of the pattern piece, and tape together as shown. Repeat this process for the top half of the pattern piece. Finally, assemble the top half and the bottom half, being careful to overlap the tabs and line up the edges. The result is a full size pattern piece for the Genevieve flap! Set the pattern piece aside until you are ready to cut out your flap.


Creating the Color Woven Fabric
A word about planning your fabric layout –
I am no expert on color theory; I’m a banker who likes to sew. As I have done this technique I have had some hits and some misses, and it took some practice to understand where my colors were going to appear in the finished product. No matter what colors you choose, the key to a beautiful result lies in the order in which you stack your fabrics before you cut the strips, or “Threads” you’ll weave together. You want to have control of the finished design, and to do that you need to know where your colors will land in what is essentially a grid of color panes. To complicate matters, you will be working with your fabrics RIGHT SIDE DOWN throughout the process. In the illustration below there are four colors, A through D. Two of the colors, A and B, will become the warp, or lengthwise Threads in your fabric, and colors C and D will become the weft (sometimes called woof), or horizontal Threads. To achieve the look below you will cut your warp Threads, the A and B colors, at the same time. Following that, you will cut your weft Threads, the C and D colors, also at the same time. D will then sit to the right of A, and C will appear below A. Plan carefully and choose your colors wisely! No matter what color your A fabric is, if you want your B fabric to appear diagonally across from it, cut those two colors at the same time. The same thing is true for the C and D colors.

Now the fun begins!
1. After selecting your fabrics, hereafter referred to as colors A through D, preshrink and press them in preparation for squaring-up and cutting the squares. I won’t cover techniques for squaring-up, but it is important that you begin your project with 18” squares cut on the straight grain of the fabric, which will minimize the stretch and distortion you could experience when you do the satin stitching later.
2. Next, prepare the pressing surface you’ll use for weaving and for fusing the fabrics. For me, this is a ½” thick foam core board, or a 30” square of corrugated cardboard on which I layer two thicknesses of Insul-Bright® insulated lining and then two layers of heavy canvas. If you already have a pressing surface that is large enough to accommodate the entire 18” square, and which will allow you to pin the Threads to it, you will want to use that.
3. Lay out your fabrics one at a time on your cutting mat, and, using your rotary cutter and your quilter’s ruler, cut each of them individually into 18” squares following the straight grain of the fabric. Turn all of your fabric RIGHT SIDE DOWN. 
4. To create your color woven fabric square, you will only need eight warp Threads and eight weft Threads, but this process will actually produce 16 of each, which will give you enough to make two color woven squares. I call them “fraternal twins” because they will look very much alike, but they won’t be identical. To cut your warp Threads, place your color B square RIGHT SIDE DOWN on your cutting mat, ensuring that it is oriented along vertical and horizontal lines on the mat, and smooth out any wrinkles.
 5. Next, place your color A square RIGHT SIDE DOWN, directly on top of color B, matching all the fabric edges and smoothing out any wrinkles. Color A in this photo is a batik, so it doesn’t look RIGHT SIDE DOWN, but I assure you, it is! Once you are sure your color squares line up, you will mark the lower edge of the uppermost color fabric with a small mark at about the center line, using a regular pen or other marking device that will show on your fabric. Also make three more marks at any interval you choose, between the center mark and the right edge of the square. Repeat on the left side making three marks between the center mark and the left edge. These marks will be your starting points for the seven cuts you are about to make. They do not need to be equidistant, but you probably should not leave more than three inches between any two marks.

A note about cutting your Threads –
You are cutting two layers of fabric at a time, and each cut you make absolutely must be identical in both the top and bottom layers. The cool factor in the finished product is in the sinuous cuts you make, but if the top and bottom layers are not cut identically, you will not be able to do your weaving successfully. As you make your cuts, go slow and vary the width of your Threads as you go, but don’t make any part of a Thread narrower than one inch. This will leave enough width for the color to show on top of the design, and for the satin stitching between the panes not to be too crowded. Cut curves, not angles, because angles are very difficult to sew over smoothly with your satin stitch. Some of your strips can and should be wider than others.
6. Beginning at the furthest mark to the right, place your rotary cutter on the mark you made and begin to make a sinuous cut. Hold down the bottom edge of the fabrics with the fingers of your non-cutting hand to keep them from slipping out of place and distorting the cut on the lower layer, (color B). Cut from the bottom edge of the stacked fabric to, and through, the top edge. You can start out straight or at any gentle angle you like, but don’t be too extreme, and remember to cut curves, not angles. Slide your newly cut Threads to the right as you go.

7. Repeat the process six more times, beginning at the marks you made in the lower edge of your fabric square, sliding the resulting Threads out of the way to the right each time, being careful to keep them in the same order they were cut. When finished, you will have eight Threads of color A, and eight Threads of color B stacked on top of each other. In your head, think of each stack as numbered 1 through 8 beginning at the left-most stack.
Remember, for this tutorial, you will have eight “leftover” warp Threads, and eight “leftover” weft Threads which can be used later to make up a bonus piece of coordinating fabric. Steps eight through thirteen cover how to remove the leftovers in such a way as to preserve their order so they can easily be used later, AND how to begin laying out the warp threads on your pressing surface for weaving.
8. When finished cutting your warp Threads, begin at Thread stack #1 and remove the top layer – the first color A Thread, (now a leftover), and set it aside, keeping it RIGHT SIDE DOWN. (You will stack the remaining leftover Threads on it as you go, in the exact order they were cut, RIGHT SIDE DOWN, to facilitate the creation of that bonus piece of fabric.)
9. Pick up the remaining Thread (color B) from stack #1 and move it to the pressing surface you have prepared. Set it lengthwise and RIGHT SIDE DOWN (straight edge to the left) on your pressing surface, and use two pins to secure it at the top edge through the canvas and the Insul-Bright®, and into the foam core board/cardboard.
10. Return to the Thread stacks and pick up the color A Thread from the top of stack #2 and move it to your surface. Place it lengthwise and to the right of your first Thread, RIGHT SIDE DOWN, matching the curves and keeping the top and bottom edges lined up straight. Again, pin it to the surface. This is a little like putting together a jigsaw puzzle. Each Thread will fit precisely into the curves of the Thread before it, colors alternating.
11. Return to stack #2 and place the color B Thread that remains there (now a leftover), RIGHT SIDE DOWN on top of the leftover color A Thread. Then, from stack #3, pick up the color A Thread, (now a leftover) and also move it to the top of the leftover stack, keeping it RIGHT SIDE DOWN. This careful placement of the leftover Threads may seem tedious and unnecessary, but you will thank me when you go to put together your bonus piece of fabric!
12. Stack #3 now has a color B Thread in it, which you will move to the pressing surface and repeat the process of fitting it precisely next to the Thread before it, RIGHT SIDE DOWN, matching curves, lining up edges, and pinning to the surface.
13. Repeat this process with the remaining stacks of colors, alternating the A and B Threads until you have created a square of alternating colors on your pressing surface that is 18” square. (Once all of your leftover warp Threads are cut and stacked, pin them together and move them away from the cutting mat.)

14. Using the clean eraser end of your pencil, carefully nudge any curves or edges that are out of alignment until all of the curves fit snugly, the edges are even, and your square looks like, well – a square! Pin the bottom edge of each Thread to the foam core board/cardboard to keep the Threads straight.
15. Next, unpin the top edges of all eight Threads on your pressing surface. Carefully peel back only the color B Threads by four to five inches, exposing the canvas beneath, without disturbing the alignment of the Threads too much. This will allow you to place your first weft Thread and begin your weaving.

16. To cut your weft Threads, place your color D square RIGHT SIDE DOWN on your cutting mat, ensuring that it is oriented along vertical and horizontal lines on the mat, and smooth out any wrinkles.
17. Next, place your color C square RIGHT SIDE DOWN, directly on top of color D, once again matching all the fabric edges and smoothing out any wrinkles as in step 5. Repeat the remainder of step 5, and all of steps 6 and 7 for colors C and D. The Threads you cut in C and D will be different than those you cut earlier, and they should be!
18. When finished cutting your weft Threads, begin at the left-most Thread stack, (stack #1), and remove the top layer – the first color C Thread, (now a leftover), and set it aside, RIGHT SIDE DOWN. You will stack the remaining leftover Threads on it in the exact order they were cut, RIGHT SIDE DOWN, again, to facilitate the creation of that bonus piece of fabric.
19. Pick up the color D Thread from stack #1 and move it to the pressing surface, rotating it clockwise 90 degrees.
20. Place your color D Thread crosswise, RIGHT SIDE DOWN (straight edge along the top), over the top of the four color A Threads, lining up the straight edge with the top edge of the square you created on your pressing surface. Pin it down on top of each of the four color A Threads.
21. Carefully roll up the color B Threads and pin the top edge of the Threads to the foam core board/cardboard through the color D Thread you just placed. Your square should now have sixteen pins across the top.

22. At the bottom of your square, unpin all of the color A Threads and lay them up and over the crosswise color D Thread to make room for the next weft Thread.

23. Return to the Thread stacks and pick up the color C Thread from the top of stack #2 and move it to your pressing surface. Again, rotate it 90 degrees to the right and place it crosswise and below the color D Thread, RIGHT SIDE DOWN. This is a little challenging as the Thread above it will be distorted by the warp Threads lying over the top. Carefully pull the color A Threads back to their original places, matching the curves and keeping all straight edges aligned.

24. Use your pencil eraser to nudge the intersections of the Threads so all lines meet with no gaps.

25. Transfer the pins from the bottom of the color B Threads to the bottom of the color A Threads, and move the B Threads up and over the crosswise color C Thread to make room for the next weft Thread.

26. Return to stack #2 and place the color D Thread that remains there (now a leftover), RIGHT SIDE DOWN on top of the leftover color C Thread. Then, from stack #3, pick up the color C Thread, (now a leftover) and also move it to the top of the leftover stack, keeping it RIGHT SIDE DOWN.
27. Stack #3 now has a color D Thread in it, which you will move to the pressing surface and repeat the process of fitting it precisely below the Thread before it, RIGHT SIDE DOWN, matching curves, lining up edges, and pinning to the surface.
28. Repeat this process with the remaining stacks of colors, alternating the C and D Threads until you have created a woven grid of alternating colors on your pressing surface that is 18” square.

29. Once all of your leftover weft Threads are cut and stacked, pin them together and move them away from the cutting mat.
30. When all of the Threads are in place on your pressing surface. Check each and every intersection of Threads and use your eraser to nudge them into alignment. This step is vital so you don’t have gaps when you are doing the satin stitch. Place as many pins as you need through the fabric and into the pressing surface as you move over the square to ensure everything stays in alignment while you adjust the remaining Threads. When you’re finished weaving, make sure there are at least two pins at each end of every Thread all the way around the outside edge. You are now ready to remove all pins in the interior of your square, leaving the ones on the perimeter in place.
31. When you are satisfied that all of your intersections are aligned with no gaps, center your 18” square of fusible interfacing on your fabric square, fusible side down. You may be tempted to remove your pins, but don’t do that just yet. Following the manufacturer’s directions, and beginning in the center, fuse the interfacing to the wrong side of your square. Work from the center out to the edges, holding the iron steady as you fuse each area. Do not move the iron as you fuse; pick it up and move it from a fused area to a non-fused area so as not to dislodge the fabric edges as you go. When you reach the outside edges of your square, remove enough pins to allow you to fuse a few inches at a time, leaving the remaining pins in place until you are ready to move the iron to the next area. You can use a pressing cloth for this step (31) if you like. Make sure all of the interfacing is properly fused over the entire area of your color woven square. At this point you will have removed all of your pins.

Now it’s time for your first reveal! Turn your fabric square over and feast your eyes on the right side of your handiwork for the first time! It’s ordinarily a surprise because the front side always looks amazing compared to the back side, which you’ve been looking at the whole time!

Stretch and distortion are your enemies in this project, so the next steps are imperative for a good result. You’ve done the meticulous weaving of your lovely fabric, being careful to keep everything in perfect alignment, and because you fused everything together, it seems like your Threads should stay obediently in place. However, because you have two layers of fabric, and only every other pane is fused to the interfacing, you will have 32 panes that are fused to exactly nothing, including two dozen with completely loose ends! When I did my first project, I didn’t follow these vital next steps, and the result was a mess!
So – now we stabilize!
32. Pin all the edges of your Threads in place around the perimeter of your square. Move your fabric square to your sewing machine and sew a wide (5mm) zig-zag stitch all the way around the outside, securing all loose ends. My machine will do a nice running zig-zag stitch, so I use that for extra stability.

33. Next, you need to secure all of the Thread edges to ensure that they won’t bunch up as you are applying the satin stitch. Set your machine for a very narrow (1mm to 1.25mm), plain, zig-zag at about 1.5mm stitch length. Beginning at the top edge of the line between your two right-most Threads, stitch along the line, keeping it in the center of your presser foot so that both Threads are caught in the stitching. It is more important to catch the edge of the exposed thread than the one below it, so if you get off center, you only need to go back and re-stitch if the uppermost thread is not tacked down. Repeat this stabilizing stitch for every line between all of your Threads. Repeat for the lines running perpendicular to the first set. Now you are ready to apply your satin stitch!

And finally, we apply that gorgeous satin stitch!
34. Wind a bobbin and thread your machine with your high sheen embroidery thread. I have had good results with both rayon and with polyester. Make sure you have a full bobbin. My machine has a large capacity bobbin that holds enough thread to do an entire square, but if your bobbin does not have a large capacity, you will want to check it often so you don’t run out in the middle of a line.
35. Set your machine for a wide (5mm) zig-zag with a short stitch length. I set mine for .25mm. Practice your satin stitch on scrap fabric that approximates the same thickness of fabrics as your square to make sure you are happy with the result. Once you’re satisfied with the stitch, you’re ready to rumble!
36. Again, beginning at the top edge of the line between your two right-most warp Threads, secure your stitch and then stitch along the line you zig-zagged, keeping the line in the center of your presser foot. Most zig-zag presser feet have a center marking, which makes it easy to follow the line. Since the stitch is so short, satin stitching these lines is a slow process, but that’s to your advantage because it makes it easier to follow curves and keep the stitch centered across the line. When you reach the bottom of your line, secure the stitches again, cut your threads, and return to the top of the square to do your second line. Avoid turning the fabric 180 degrees and sewing back the opposite direction because depending on your thread, it could cause the appearance of every other line to be slightly different.

37. Stitch each of your seven lines between the warp Threads before pivoting your fabric 90 degrees to stitch the lines between the weft Threads.

Here’s your second big reveal! Your color woven fabric square is now complete and is ready to be used in the project of your choice.

After you cut out whatever shape you are doing, be absolutely certain to zig-zag all the way around the outside edge with a fairly short stitch to help keep the satin stitching from unravelling. When you are going to zig-zag over the end of a line of satin stitches, sew over it, reverse your stitch and sew over it backwards, then sew over it again going forward before continuing around the shape.

Remember that you have a whole other complete set of Threads that you can use to weave and stitch another beautiful square. Bear in mind that the Genevieve pattern’s option for either of the piped flaps, which are made in sections, is not appropriate for the color woven fabric. Steps 38 through 40 address using the Genevieve pattern piece assembled at the beginning of this tutorial for cutting out a flap.
38. If you are cutting a flap, either full or shaped, for the ChrisW Designs “Genevieve,” you can place the pattern piece in such a way as to feature elements of the woven fabric that you like. Because the satin stitching will minimize stretching, you can even place the flap on the bias. If you do choose to place the pattern piece on the bias, place your quilters ruler across the fabric and the pattern piece with one edge of the ruler covering the square from corner to corner. Line up the original fold line down the center of your pattern piece with the edge of the ruler.

39. Pinning the pattern piece to the color woven square and cutting out the shape can distort the result because of the satin stitching and the fabric layers. I print my patterns on card stock, so I always use just a few pins to keep the pattern piece stable, but then I use a fabric marking pen to draw the outline of the shape directly on the fabric before cutting it out. When I cut my actual flap out of this, I didn’t do it on the bias because I wanted to feature a couple of the batik panes.

40. Remember, once you have cut out your flap, zig-zag all the way around the outside edge with a fairly short stitch to help keep the satin stitching from unravelling. When you are going to zig-zag over the end of a line of satin stitches, sew over it, reverse your stitch and sew over it backwards, then sew over it again going forward before continuing around the shape.

Here is a shot of the bag in progress with the flap installed.

The possibilities are endless with this technique. You could increase or even vary the number of warp and weft Threads; you could either hand or machine embroider designs in the panes; you could cut and weave only two colors (someone gave me an idea for making a flap in black and white to look like a checkered flag use in car racing!); or you could even use a variegated thread for the satin stitch. I am excited to find out what Christine’s talented readers will do with this!
Thank you again for the opportunity to make a contribution to this community!

———————————————————————————–
Thank you so much for sharing your fantastic technique with us Dianna! It is amazing and I can't wait until I have some time to try this myself!
Now I hope to see a lot more Genevieve's with awesome flaps showing up to impress us! Of course, you can adapt this technique to use on just about any bag you like! Please DO let us know if you give it a whirl! Pop along and share in our Facebook Group so Dianna can see her technique in action….or pop them in our Flickr Pool….Use the hashtag #genevieve to share on instagram too!…..or even email them to me! It's all good! 🙂
Need to grab a copy of Genevieve? You can get it HERE!


View the entire comment thread.
Please enable JavaScript if you would like to comment on this blog.
Welcome!
- Don’t you just LOVE handbags? I know I do and I am TOTALLY addicted to making them! Imagine being able to make handbags and purses that are unique to YOU and exactly the style, colour, size and shape that YOU want them to be? ChrisW Designs range of designer bag patterns will help you to do just that! Nobody will believe you made them yourself!

Search


.sidebar-slider-sew_alongs .bx-viewport { border: 0 !important; background: transparent !important; }
.sidebar-slider-sew_alongs .bx-viewport img { margin: 0 !important; }
.sidebar-slider-sew_alongs .bx-controls { margin-top: -10px !important; }
.sidebar-slider-sew_alongs li:not(:first-of-type) { display: none; }
Sew Alongs
@chriswdesigns
.sidebar-slider-bag_making_tutorials .bx-viewport { border: 0 !important; background: transparent !important; }
.sidebar-slider-bag_making_tutorials .bx-viewport img { margin: 0 !important; }
.sidebar-slider-bag_making_tutorials .bx-controls { margin-top: -10px !important; }
.sidebar-slider-bag_making_tutorials li:not(:first-of-type) { display: none; }
Tutorials
.sidebar-slider-guest_posts .bx-viewport { border: 0 !important; background: transparent !important; }
.sidebar-slider-guest_posts .bx-viewport img { margin: 0 !important; }
.sidebar-slider-guest_posts .bx-controls { margin-top: -10px !important; }
.sidebar-slider-guest_posts li:not(:first-of-type) { display: none; }
Popular Posts
Categories
- Bag Making Resources
- Bag Making Tips
- Bag Making Tutorials
- Bag Naming Competitions!
- Bag Photos
- Blank Slate Sketches
- Blog Hops
- ChrisW Designs Bag Sewing Video Tutorials
- ChrisW Designs Patterns
- Competitions
- Easy Street Patterns
- Featured
- Free Patterns
- Fundamentals
- Giveaways!
- Guest Posts
- In the Press
- Inspirational Bags
- Minimise to Maximise
- My Ramblings
- My Studio
- NEW Patterns
- News
- Pattern Hacks
- Pattern Info!
- Ready Made Bags
- Revised Patterns
- Sales!
- Sew Alongs
- Sewing Machine Reviews
- Sewing Spaces
- Sewist Interviews
- Sponsored Posts
- Strap Series
- The Art of Bag Making
- Tools of the Trade!
- Website ChitChat
- Zipper 101
Visit Christine Welsh’s profile on Pinterest.
Junyuan Bags | Professional Bag Manufacturer
Ten articles before and after
The Kiss Clutch made with Quilt As You Go (QAYG) techniques – ChrisW Designs
Reducing the Stow It All Tote by 15% – By Karen Wetherall
Sewing With Cork – by Toni of The Little British Fabric Shop – ChrisW Designs
How to Sew a Fabric Tab End on a Zipper!
Stand Alone ID Window Tutorial
Alternative Card Slot ID Window Tutorial


 Mobile/What's App/Wechat
 E-Mail
 ADD
ADD


