Alternative Card Slot ID Window Tutorial
Tuesday, 18 August 2015
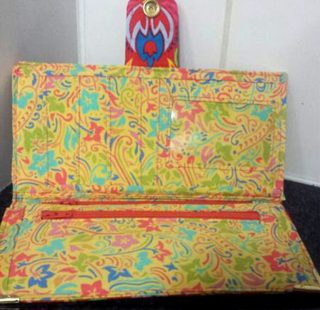
How is everyone enjoying sewing their Pick A Pocket Wallets? Having FUN I hope! Well today I have an awesome tutorial by Mel to share with you. It's an alternative method of making your ID window to get a super neat finish! Let's take a look….over to you Mel-
———————————————

Hello everyone! My name is Mel (Melanie Euhus if you must!), and I’m thrilled to have been asked to be a guest blogger!! Thanks so much Christine!
I previously had a tutorial on how to make a neat ID Window, that can be attached to any bag or wallet. In this example I was working on Chris’ Pick-a-Pocket Wallet, so this is designed to go on top of card slots. You may also need to check the measurements on the pattern you are using, and adjust accordingly. Let’s go!
STEP ONE
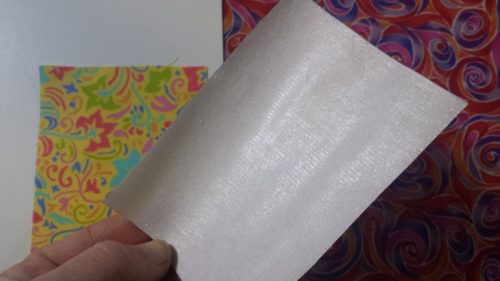
Get a piece of fusible applique paper, such as Vliesofix, or Heat n Bond Lite. You will see it has a dull (paper) side, and a shiny (adhesive) side.
STEP TWO
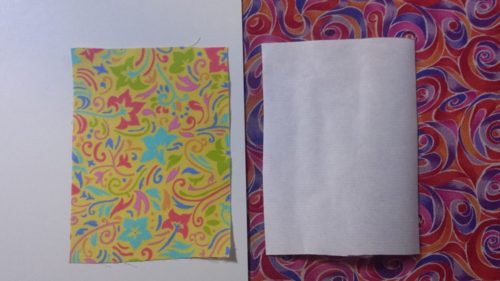
Cut this piece the same size as your ID Window Pattern piece.
STEP THREE
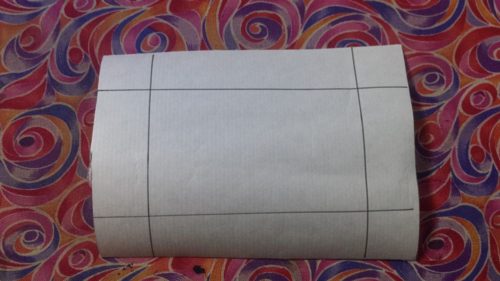
Draw the lines, ¾” in from each side, onto the paper side of the applique paper.
STEP FOUR
Cut out the centre rectangle from the the lines you drew (cutting off the ¾” edges). Position this rectangle centred on the wrong side of your fabric piece, ¾” in from the sides, adhesive side down. Fuse in place.
Draw an ‘X’ between the corners of the paper
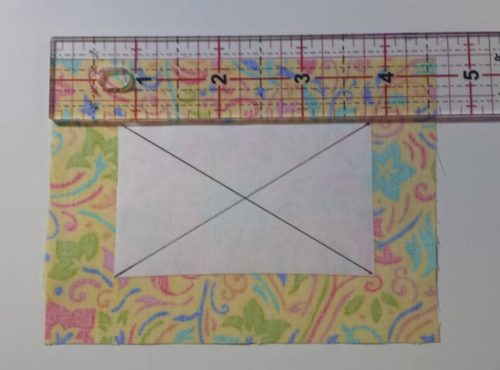
STEP FIVE
Use a seam ripper to get you started, then a small pair of scissors to cut along the lines, to the corners of the paper.
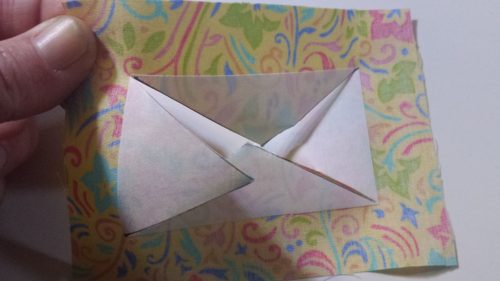
STEP SIX
Trim each of the centre points so that you have about ½” of paper edges left.
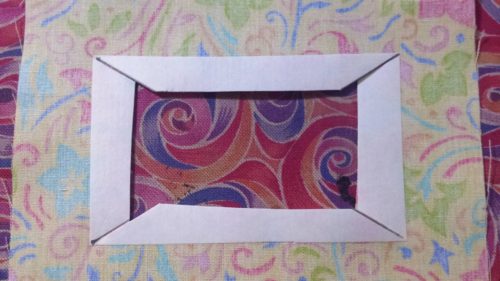
STEP SEVEN
Peel away the paper backing, revealing the adhesive.
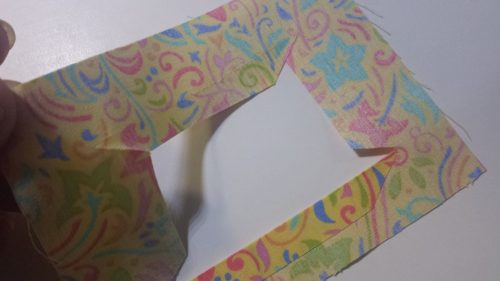
STEP EIGHT
Fold your edges over, lining it straight along the sides and finger press. Then CAREFULLY take the tip of your iron to fuse in place, one side at a time.
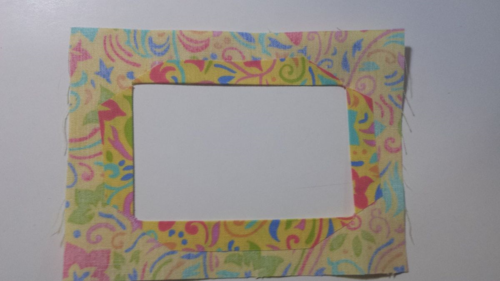
STEP NINE
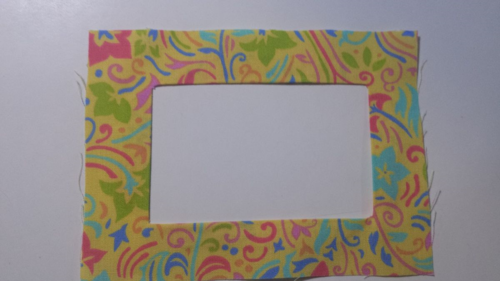
Flip over the right side, admire your handiwork, and continue with the pattern instructions to add your vinyl!
—————————————
AWESOME tutorial Mel! Thanks so much for sharing it with us! Now why didn't I think to do it that way in the first place?
The good news is that Mel has another ID window tutorial to share with us….so watch for that coming soon!
To see more of Mel's work, visit her on Facebook Buntings & Things, HERE!
Missed the Pick A Pocket Sew Along with Ellen? You can see Part One HERE, Part two HERE! & Part Three Here! Part four HERE!


|
Comments (2)
|
Comments
Alternative Card Slot ID Window Tutorial

How is everyone enjoying sewing their Pick A Pocket Wallets? Having FUN I hope! Well today I have an awesome tutorial by Mel to share with you. It's an alternative method of making your ID window to get a super neat finish! Let's take a look….over to you Mel-
———————————————

Hello everyone! My name is Mel (Melanie Euhus if you must!), and I’m thrilled to have been asked to be a guest blogger!! Thanks so much Christine!
I previously had a tutorial on how to make a neat ID Window, that can be attached to any bag or wallet. In this example I was working on Chris’ Pick-a-Pocket Wallet, so this is designed to go on top of card slots. You may also need to check the measurements on the pattern you are using, and adjust accordingly. Let’s go!
STEP ONE
Get a piece of fusible applique paper, such as Vliesofix, or Heat n Bond Lite. You will see it has a dull (paper) side, and a shiny (adhesive) side.

STEP TWO
Cut this piece the same size as your ID Window Pattern piece.

STEP THREE
Draw the lines, ¾” in from each side, onto the paper side of the applique paper.

STEP FOUR
Cut out the centre rectangle from the the lines you drew (cutting off the ¾” edges). Position this rectangle centred on the wrong side of your fabric piece, ¾” in from the sides, adhesive side down. Fuse in place.
Draw an ‘X’ between the corners of the paper

STEP FIVE
Use a seam ripper to get you started, then a small pair of scissors to cut along the lines, to the corners of the paper.

STEP SIX
Trim each of the centre points so that you have about ½” of paper edges left.

STEP SEVEN
Peel away the paper backing, revealing the adhesive.

STEP EIGHT
Fold your edges over, lining it straight along the sides and finger press. Then CAREFULLY take the tip of your iron to fuse in place, one side at a time.

STEP NINE
Flip over the right side, admire your handiwork, and continue with the pattern instructions to add your vinyl!

—————————————
AWESOME tutorial Mel! Thanks so much for sharing it with us! Now why didn't I think to do it that way in the first place?
The good news is that Mel has another ID window tutorial to share with us….so watch for that coming soon!
To see more of Mel's work, visit her on Facebook Buntings & Things, HERE!
Missed the Pick A Pocket Sew Along with Ellen? You can see Part One HERE, Part two HERE! & Part Three Here! Part four HERE!


View the entire comment thread.
Please enable JavaScript if you would like to comment on this blog.
Welcome!
- Don’t you just LOVE handbags? I know I do and I am TOTALLY addicted to making them! Imagine being able to make handbags and purses that are unique to YOU and exactly the style, colour, size and shape that YOU want them to be? ChrisW Designs range of designer bag patterns will help you to do just that! Nobody will believe you made them yourself!

Search


.sidebar-slider-sew_alongs .bx-viewport { border: 0 !important; background: transparent !important; }
.sidebar-slider-sew_alongs .bx-viewport img { margin: 0 !important; }
.sidebar-slider-sew_alongs .bx-controls { margin-top: -10px !important; }
.sidebar-slider-sew_alongs li:not(:first-of-type) { display: none; }
Sew Alongs
@chriswdesigns
.sidebar-slider-bag_making_tutorials .bx-viewport { border: 0 !important; background: transparent !important; }
.sidebar-slider-bag_making_tutorials .bx-viewport img { margin: 0 !important; }
.sidebar-slider-bag_making_tutorials .bx-controls { margin-top: -10px !important; }
.sidebar-slider-bag_making_tutorials li:not(:first-of-type) { display: none; }
Tutorials
.sidebar-slider-guest_posts .bx-viewport { border: 0 !important; background: transparent !important; }
.sidebar-slider-guest_posts .bx-viewport img { margin: 0 !important; }
.sidebar-slider-guest_posts .bx-controls { margin-top: -10px !important; }
.sidebar-slider-guest_posts li:not(:first-of-type) { display: none; }
Popular Posts
Categories
- Bag Making Resources
- Bag Making Tips
- Bag Making Tutorials
- Bag Naming Competitions!
- Bag Photos
- Blank Slate Sketches
- Blog Hops
- ChrisW Designs Bag Sewing Video Tutorials
- ChrisW Designs Patterns
- Competitions
- Easy Street Patterns
- Featured
- Free Patterns
- Fundamentals
- Giveaways!
- Guest Posts
- In the Press
- Inspirational Bags
- Minimise to Maximise
- My Ramblings
- My Studio
- NEW Patterns
- News
- Pattern Hacks
- Pattern Info!
- Ready Made Bags
- Revised Patterns
- Sales!
- Sew Alongs
- Sewing Machine Reviews
- Sewing Spaces
- Sewist Interviews
- Sponsored Posts
- Strap Series
- The Art of Bag Making
- Tools of the Trade!
- Website ChitChat
- Zipper 101
Visit Christine Welsh’s profile on Pinterest.
Junyuan Bags | Professional Bag Manufacturer
Ten articles before and after
Stand Alone ID Window Tutorial
How to Sew a Fabric Tab End on a Zipper!
Creating Fabric Using Color Weaving – With Dianna Leckner!
The Kiss Clutch made with Quilt As You Go (QAYG) techniques – ChrisW Designs
Reducing the Stow It All Tote by 15% – By Karen Wetherall
Carry Your Picnic Bag and Enjoy Your Life
The Best Travel Case Fit For PS5 System
4 Luxurious Ways to Bling Your Home Office – Junyuan Bags
Gifts For Any Occasion: How To Select a Great Gift – Junyuan Bags


 Mobile/What's App/Wechat
 E-Mail
 ADD
ADD


