The Art of Bag Making – Personalized Gizmo Garage
Friday, 28 July 2017
Today we have another guest post from Karen to share with you! This one is all about Personalising a Gizmo Garage! Over to you Karen:
—————————————————————————-
A new florist opened up in the next village and once we got talking I was soon making her a couple of cushions for the shop with her logo on. Not long afterwards she asked if I could make her a bag to carry her laptop and paperwork when she visited brides to discuss wedding flowers, also with her logo on. I immediately thought of the Gizmo Garage, which would do everything she wanted and had two flaps for logos!

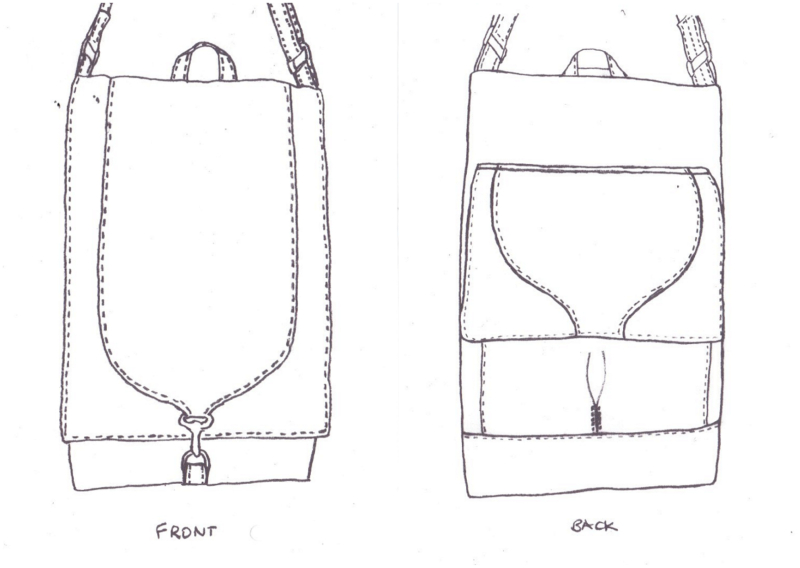
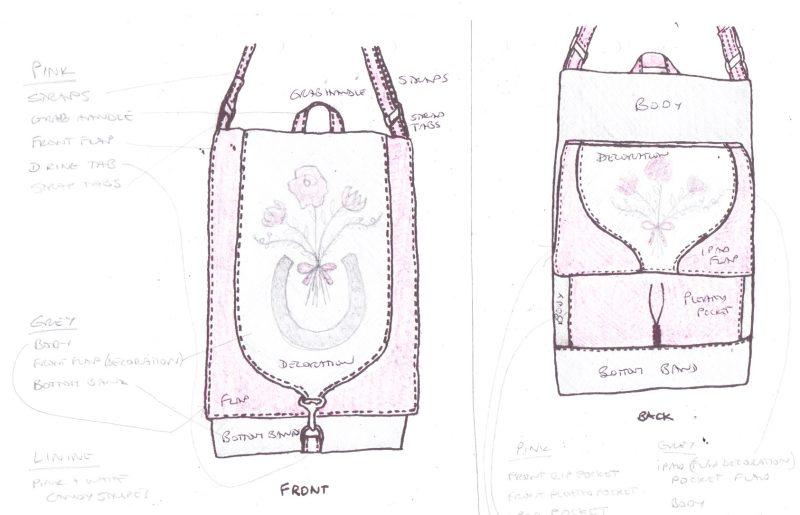
The Gizmo comes in three sizes and after measuring her laptop we decided the Medium one would be the best size. Next I ordered the fabric, a luxury faux suede in New Grey and Hot Pink and for the lining a pink and white stripe AND a beautiful pansy print from my stash! I read through the whole pattern, then did my usual outline drawings but of both the front AND back this time as the second flap is on the back.


I have used this faux suede before and normally it resists pressing, but this time I had my new secret weapon, a Treated Pressing Cloth! Christine sung the praises of her Rajah Cloth on Instagram recently and I was jealous! I complained they were not available here in the U.K. but was told to buy the Hemline Pressing Cloth as it was the same!I have to say it is marvellous, and my faux suede is behaving now!

The next addition is when you reach Step 9 MAKE FLAP – this is where I add the logo appliqué before going any further. The logo on her business card had to be enlarged 400% then traced. I write RIGHT SIDE and WRONG SIDE on the paper to prevent accidents, and trace the design onto Bondaweb (Wonderunder) from the WRONG SIDE.

Once the petals are cut out and the paper backing removed I lay the RIGHT SIDE tracing centred on the Front Flap Decoration piece, and use a pair of long tweezers to place the petals in position underneath. I can then lift the tracing off and fuse in place with the iron. I use a zig zag stitch for my appliqué starting with the stems, then the ribbon, then the flower head. Then I add each colour petal to finish.

Then it is on with the instructions until Step 12 MAKE IPAD POCKET FLAP and again add the applique, this time to a slightly smaller scale, then traced it as before. Here is the finished bag, front and back:

To give you an idea of size here is a full length shot (I am 5 foot 3 inches) and one of me holding it by the Grab Handle:

————————————————————–
Thank you so much Karen for another awesome post! You can read more of Karen's posts over at Sew What's New HERE and visit Karen on Instagram - @auntystitches
Happy Sewing! 🙂


|
Comments (4)
|
Comments
The Art of Bag Making – Personalized Gizmo Garage
Today we have another guest post from Karen to share with you! This one is all about Personalising a Gizmo Garage! Over to you Karen:
—————————————————————————-
A new florist opened up in the next village and once we got talking I was soon making her a couple of cushions for the shop with her logo on. Not long afterwards she asked if I could make her a bag to carry her laptop and paperwork when she visited brides to discuss wedding flowers, also with her logo on. I immediately thought of the Gizmo Garage, which would do everything she wanted and had two flaps for logos!

The Gizmo comes in three sizes and after measuring her laptop we decided the Medium one would be the best size. Next I ordered the fabric, a luxury faux suede in New Grey and Hot Pink and for the lining a pink and white stripe AND a beautiful pansy print from my stash! I read through the whole pattern, then did my usual outline drawings but of both the front AND back this time as the second flap is on the back.


I have used this faux suede before and normally it resists pressing, but this time I had my new secret weapon, a Treated Pressing Cloth! Christine sung the praises of her Rajah Cloth on Instagram recently and I was jealous! I complained they were not available here in the U.K. but was told to buy the Hemline Pressing Cloth as it was the same!I have to say it is marvellous, and my faux suede is behaving now!

The next addition is when you reach Step 9 MAKE FLAP – this is where I add the logo appliqué before going any further. The logo on her business card had to be enlarged 400% then traced. I write RIGHT SIDE and WRONG SIDE on the paper to prevent accidents, and trace the design onto Bondaweb (Wonderunder) from the WRONG SIDE.

Once the petals are cut out and the paper backing removed I lay the RIGHT SIDE tracing centred on the Front Flap Decoration piece, and use a pair of long tweezers to place the petals in position underneath. I can then lift the tracing off and fuse in place with the iron. I use a zig zag stitch for my appliqué starting with the stems, then the ribbon, then the flower head. Then I add each colour petal to finish.

Then it is on with the instructions until Step 12 MAKE IPAD POCKET FLAP and again add the applique, this time to a slightly smaller scale, then traced it as before. Here is the finished bag, front and back:

To give you an idea of size here is a full length shot (I am 5 foot 3 inches) and one of me holding it by the Grab Handle:

————————————————————–
Thank you so much Karen for another awesome post! You can read more of Karen's posts over at Sew What's New HERE and visit Karen on Instagram - @auntystitches
Happy Sewing! 🙂


View the entire comment thread.
Please enable JavaScript if you would like to comment on this blog.
Welcome!
- Don’t you just LOVE handbags? I know I do and I am TOTALLY addicted to making them! Imagine being able to make handbags and purses that are unique to YOU and exactly the style, colour, size and shape that YOU want them to be? ChrisW Designs range of designer bag patterns will help you to do just that! Nobody will believe you made them yourself!

Search


.sidebar-slider-sew_alongs .bx-viewport { border: 0 !important; background: transparent !important; }
.sidebar-slider-sew_alongs .bx-viewport img { margin: 0 !important; }
.sidebar-slider-sew_alongs .bx-controls { margin-top: -10px !important; }
.sidebar-slider-sew_alongs li:not(:first-of-type) { display: none; }
Sew Alongs
@chriswdesigns
.sidebar-slider-bag_making_tutorials .bx-viewport { border: 0 !important; background: transparent !important; }
.sidebar-slider-bag_making_tutorials .bx-viewport img { margin: 0 !important; }
.sidebar-slider-bag_making_tutorials .bx-controls { margin-top: -10px !important; }
.sidebar-slider-bag_making_tutorials li:not(:first-of-type) { display: none; }
Tutorials
.sidebar-slider-guest_posts .bx-viewport { border: 0 !important; background: transparent !important; }
.sidebar-slider-guest_posts .bx-viewport img { margin: 0 !important; }
.sidebar-slider-guest_posts .bx-controls { margin-top: -10px !important; }
.sidebar-slider-guest_posts li:not(:first-of-type) { display: none; }
Popular Posts
Categories
- Bag Making Resources
- Bag Making Tips
- Bag Making Tutorials
- Bag Naming Competitions!
- Bag Photos
- Blank Slate Sketches
- Blog Hops
- ChrisW Designs Bag Sewing Video Tutorials
- ChrisW Designs Patterns
- Competitions
- Easy Street Patterns
- Featured
- Free Patterns
- Fundamentals
- Giveaways!
- Guest Posts
- In the Press
- Inspirational Bags
- Minimise to Maximise
- My Ramblings
- My Studio
- NEW Patterns
- News
- Pattern Hacks
- Pattern Info!
- Ready Made Bags
- Revised Patterns
- Sales!
- Sew Alongs
- Sewing Machine Reviews
- Sewing Spaces
- Sewist Interviews
- Sponsored Posts
- Strap Series
- The Art of Bag Making
- Tools of the Trade!
- Website ChitChat
- Zipper 101
Visit Christine Welsh’s profile on Pinterest.
Junyuan Bags | Professional Bag Manufacturer
Ten articles before and after
Bling My Emma Flap Tutorial – ChrisW Designs
Decorative Stitches Clutch Tutorial by Daryl of Patchouli Moon Studio – ChrisW Designs
Bag Making Tutorials – ChrisW Designs
Pieced & Applique Flap Tutorial by Daryl of Patchouli Moon Studio – ChrisW Designs
Sewing With Cork – by Toni of The Little British Fabric Shop – ChrisW Designs


 Mobile/What's App/Wechat
 E-Mail
 ADD
ADD


