Quick and Easy Tips on How to Install Hydration Bladder in Backpack
Introduction
Do you wish to have a hydration system in your regular backpack? Are you planning for an excursion trip in the days to come, and this question makes you go sad for not owning one? Do not worry; the good news is that you can retrofit a hydration bladder in your backpacks with a few simple steps. It is as easy as blowing some pixie dust and transforming your regular backpacks into one with a proper hydration bladder system.Check out this guide to get acquainted with the steps on how to install hydration bladder in backpack and how to load hydration pack and all the associated details of owning a backpack with hydration system:
Platypus Hoser Hands-Free Hydration System Water Reservoir, 1.8-Liter, with Fast Flow Valve
- Ultralight taste-free, minimalist reservoir with high flow rate for hydration on the go while backpacking, thru-hiking, and day hiking
- Simple, one-piece, self-sealing HyFLO bite valve makes it quick and easy to hydrate hands-free with a 30% increased flow rate
- Hang/carry loop easily secures the reservoir in a backpack or elsewhere; outlet works with all threaded Platypus drink tubes and closure caps
- The Hoser is taste-free, BPA-free, BPS-free, and phthalate-free; features embedded silver-ion to protect reservoir from mold and bacteria
- 1.8-Liter measures 7.75 x 11.5 inches and weighs 3.4 ounces; manufacturer’s limited lifetime warranty; made in the USA
Prices pulled from the Amazon Product Advertising API on:
Product prices and availability are accurate as of the date/time indicated and are subject to change. Any price and availability information displayed on [relevant Amazon Site(s), as applicable] at the time of purchase will apply to the purchase of this product.
Working of a Hydration Bladder
If you are planning out a trekking trip or are planning to run a marathon in the coming days, then a backpack with a proper hydration bladder is one of the essentials to own. This hydration bladder helps you store your hydration liquids and juices in your backpacks safely without spilling it inside your bags and spoiling your other gears. Another advantage of using hydration system backpacks is that you save yourselves from the chore of taking out your bag and playing the queen of Sheba game to fetch your water bottle to moisten your throat.
In this article, you are going to learn DIY ways to install a hydration system in your backpacks.
Reasons to Own a Backpack With Hydration System
Before we proceed to learn how to install a hydration bladder in your backpack, let me give you an insight into all the right reasons to install a hydration pack in your backpack:
Ease and Convenience
When you are on the go, backpacks are supposed to be your best friends. And having a hydration system installed in your backpack is even better in such scenarios. They are easy to use and do not require the hassles of reaching out for your water bottle to have a sip. They are easy to use and can be accessed easily without seeking help from your friends. Having a hydration system installed in it allows you to stay hydrated at all times through a pipe that can directly slide in your mouth to quench your thirst.
Gives You a Hands-Free Alternative
You must have seen trekkers carrying their water bottles in their hands as they find it difficult to stop and take them out from their backpack when they’re thirsty. Having a bottle in hand is a handy option that prevents them from taking frequent breaks while climbing up the hills. But carrying a backpack with a hydration system installed cuts the chap of holding water bottles in your hand and allows all the freedom to walk free-handed.
Medical Factors
Water is essential to stay hydrated and is no less than medicine when you are out at higher altitudes. Sipping water at regular intervals will help one stay properly hydrated while preventing altitude sickness and associated risks. Using a hydration pack allows ease in doing the same and saves you from gulping the water in one go from a water bottle which may result in gag reflexes causing stomach jolts.
STREAMER RESERVOIR 3L
Product prices and availability are accurate as of the date/time indicated and are subject to change. Any price and availability information displayed on [relevant Amazon Site(s), as applicable] at the time of purchase will apply to the purchase of this product.
Things to Consider When Getting a Hydration Bladder
Installing a hydration bladder in a backpack is quite easy, but one needs to be particular while getting a new hydration bladder for their backpack. Here are important things you need to know before getting a new hydration bladder for your backpack.
- Quality: Quality is one such factor that shouldn’t be compromised at any cost while getting a hydration bladder. It’s not just a fancy plastic bag that comes with a tube to store your water while you enjoy a hiking or trekking trip, but it is something that can easily lead to health problems if quality is ignored. The quality of the bladder should be good enough to safely store your water without contaminating it in any way.
- Purpose: There can be various reasons that may make you think of getting a hydration pack for your backpack. Cycling, skiing, running, trekking, etc. can be a few reasons to get one. So choose a hydration pack taking into account your intended activity.
- The capacity of the hydration pack: Owing to the purpose of use, you should also take into account the capacity of the hydration bladders to suit your purpose. Day long expeditions may require you to go for bigger bladders, whereas a short trip can do with a small-sized hydration bladder.
- Ease of drinking and refilling: Hydration packs should be such that it provides an ease to the user to drink water using the pipe and should allow smooth flow of water leading to the hose. Also, ensure that the hydration bladder can be easily topped up with the next batch of fluid when it gets empty.
- Ease in cleaning: Keeping the hydration packs clean is mandatory as it ensures the safety of the user drinking from it. Thus getting a hydration pack that is easy to clean should be a priority. A hydration pack that allows you to reach every corner of the bladder will not only last longer but will also ensure that you remain healthy.
- Pocket size: This is something that most of you would tend to overlook. But checking out the pocket size is also important so that you get a hydration bladder that can securely fit inside your backpack without causing any kind of misfit.
Prices pulled from the Amazon Product Advertising API on:
Product prices and availability are accurate as of the date/time indicated and are subject to change. Any price and availability information displayed on [relevant Amazon Site(s), as applicable] at the time of purchase will apply to the purchase of this product.
How to Install Hydration Bladder in Backpack
Backpacks with hydration bladder can give you all the reasons to enjoy your trek trip without taking unnecessary breaks to get your bottle out of your backpack. So here is a quick guide on how to install hydration bladder in your backpack:
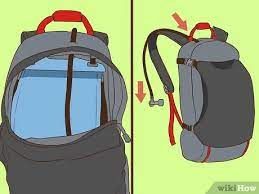
Locate the right spot – The very first thing that you need to do when installing a hydration system in your backpack is to find out the apt spot for installing it. For proper installation, use the side pockets of your backpack as it is convenient and spacious enough to hold the hydration bladder. You can also choose any other location for the installation according to your preference.
Fixing the hydration bladder – Once you have decided where to place the hydration bladder, make it run along with the harness and further clip the bladder at its place. Also, ensure that the exit end of the hose of hydration bladder faces the bottom.
Testing – Once you have fixed the bladder, try using it to ensure that it is working properly. Check for any kind of knots or twists that may prevent the water from flowing swiftly to your mouth. Once you have checked it out, you are all set to use the hands-free mode for drinking water during your trekking trip.
Tips to take care of your hydration bladder
Hydration bladders are one of the most essential trekking gears that one should have in their trekking check list. But taking care of it is another vital thing that you should do to have access to clean and safe drinking water during your trip. So here are a few easy tips to take care of your hydration backpacks:
Regular Rinsing
It’s important to rinse the hydration bladder after every use. In case, you are on a week long hiking trip etc, then it’s always good to rinse the bladder every night. Just rinsing with plain water, or mild soap water should be good. The most important part of it is to clean the pipes/hose. Clean it out with a small brush and ensure that you run water through the mouthpiece and hose so that your hydration pack is fully clean before the next use.
Drying
Once you have cleaned the hydration pack thoroughly, do not use it straight off without drying it. Leave the hydration pack for drying by hanging it with its cap open so that it dries out completely. The drying time of the hydration packs depends on the humidity and climate and may vary depending on the place where you are staying. But make sure that you do not rush with the drying process and allow the pack enough time to dry out completely.
Freezing
Freezing is also a preventive measure to safeguard your hydration packs from accruing any growth of mildew. Despite taking all the measures to dry off the hydration packs, the chances are that the packs may be prone to mold growth and mildew attack. Thus, it is always good to freeze the hydration packs in lieu of eliminating any such risks that may creep up.
Conclusion
While you plan to enjoy the trails, a backpack with a hydration bladder serves to be a guardian angel to keep you hydrated during your excursion. Holding a bottle in your hand and proceeding with your trekking pole can make the entire experience really unpleasant. Thus, it is always better to go for a backpack that has a hydration bladder to cater to your water needs. If you do not have the time to install a bladder into your backpack then there are many backpacks out there that come with pre-installed hydration bladders.
Frequently Asked Questions
Are hydration packs worth it?
Though it still comes down to how much water you’ll need and your personal preference of how you want to carry that weight, the short answer is, yes – if you’re taking part in trail activities that are longer than 10km/6 miles in length, it’s a good idea to invest in a hydration pack.
How do you fill a backpack with a water bladder?
To refill your hydration bladder, simply disconnect the blue hose and attach the clear hose. Fill the collapsible Evernew Water Carry or repurposed Smart Water brand bottles with water and then attach to the blue bottle connector.
How do hydration packs work?
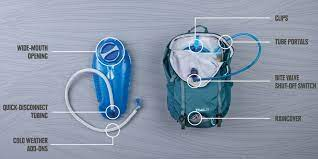
How do they Work? Hydration packs come in the form of backpacks or waist packs, similar to the appearance of a fanny pack. The pack works by having a plastic or rubber ‘bladder’ that can be filled with liquid. The bladder has a small cap for easy filling and a hose attached to it for consuming the liquid.
Can you put a hydration bladder in a regular backpack?
Yes, you can put a hydration pack into a regular backpack. You should first find a good spot to store your hydration bladder on your backpack (e.g. the side pocket or other pockets that are big and snug enough to hold the bladder). Then make sure that the bladder hose exit is at the bottom of the backpack.
How do you put a hydrapak in a backpack?
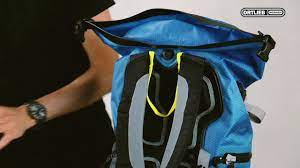
To open, pull the slider top sideways from the closed/flared end until removed. Unfold the opening and pull the two sides apart. To close, fold the top molded parts down once and slide the slider top across the length of the folded area to seal.
Ten articles before and after
Everything You Need to Know About When the Backpack Was Invented – Junyuan Bags
2 Easy Ways to Make a Stylish Backpack Out of Old Jeans – Junyuan Bags
Quick and Easy Tips on How to Pack a Backpack for Traveling – Junyuan Bags
What Size of Pottery Barn Backpack is Best for Kindergartens – Junyuan Bags
How Big Is a 30 Liter Backpack: A Complete Guide – Junyuan Bags
Effective Tips and Tricks on How to Clean Osprey Backpack – Junyuan Bags
What is a Backpack Rapper? – Junyuan Bags
Life Saving Tips on How to Wear a Backpack Properly – Junyuan Bags
Can You Bring a Carry on and a Backpack Together: A Quick Guide – Junyuan Bags
ᐅ Why You Need a Backpack That Slides Over Luggage Handles – Junyuan Bags


 Mobile/What's App/Wechat
 E-Mail
 ADD
ADD


