Bling My Emma Flap Tutorial
Tuesday, 10 March 2020
Today I am happy to share a guest post from one of our lovely Facebook Group members. Sonja recently won "People's Choice" in our 2020 Colour Challenge competition, which ran over in our Facebook Group. She made an Emma with a flap so gorgeous it blew everyone away!
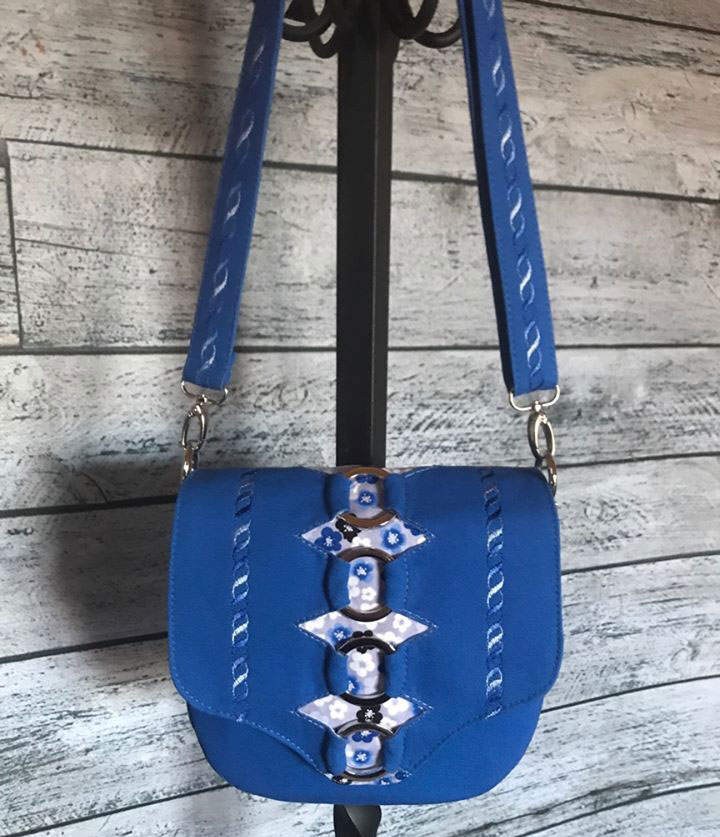
WOOP! Today she is sharing her method on how to make the flap. Over to you Sonja:
—————————————————————————–
Hello Everyone! I am so honored to have been asked to write this tutorial on creating a super blingy flap using ChrisW’s “Emma” pattern.
The overlay pattern can be found as a free download on YouTube here: “Mochila Rock Girl Jurubeba”. This pattern is for a mini backpack using non-woven fabrics (vinyl, cork, etc.) by Simone Jurubeba. I wanted to be able to use this pattern with woven fabrics and had to figure out how to finish all the seams, and so, here we are.
You will need:
• Emma pattern by ChrisW Designs (print at 100%)
• Mochila Rock Girl Jurubeba pattern (print at 75%).
• Overlay Fabric (the fabric on top of flap) 12” W x 10 ½” H
• Bottom Fabric (will be referred to as Emma Flap fabric)
• (4) Rings (can be round or rectangular). These are the rings I used on the Blue Emma from Hobby Lobby:
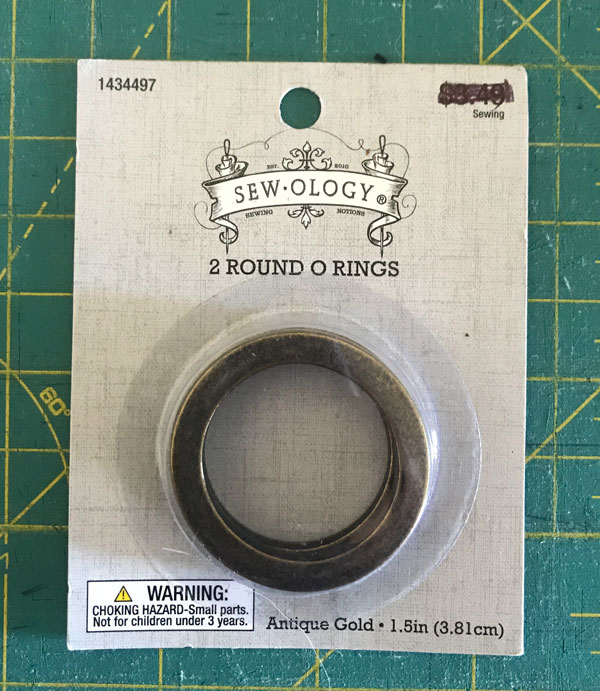
TIP: For a different look you could use eyelets and lace ribbon through them (think corset – ooh la la!!), or you could get creative with rivets as well. For this tutorial we will be using (4) 1” rectangle rings.
• Woven interfacing (such as WovenFuse)
Get your game face on, we are about to start the journey ?
Preparing Your Pattern Pieces:
Emma Flap Pattern: Add 1 ½” to the top of the flap pattern. (This will allow your top ring to be visible when the flap is closed.)
Overlay pattern: Print at 75%
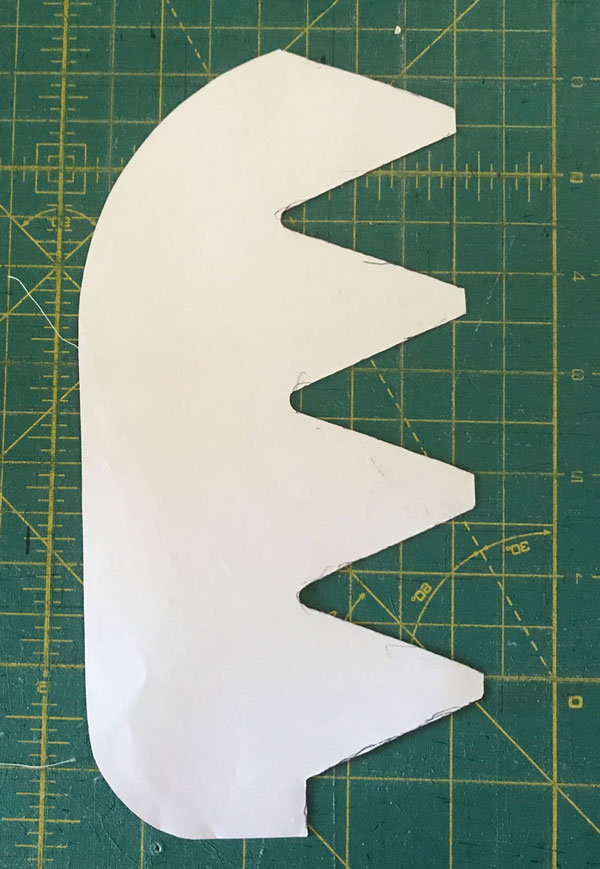
Turn pattern upside down (Very important!!).
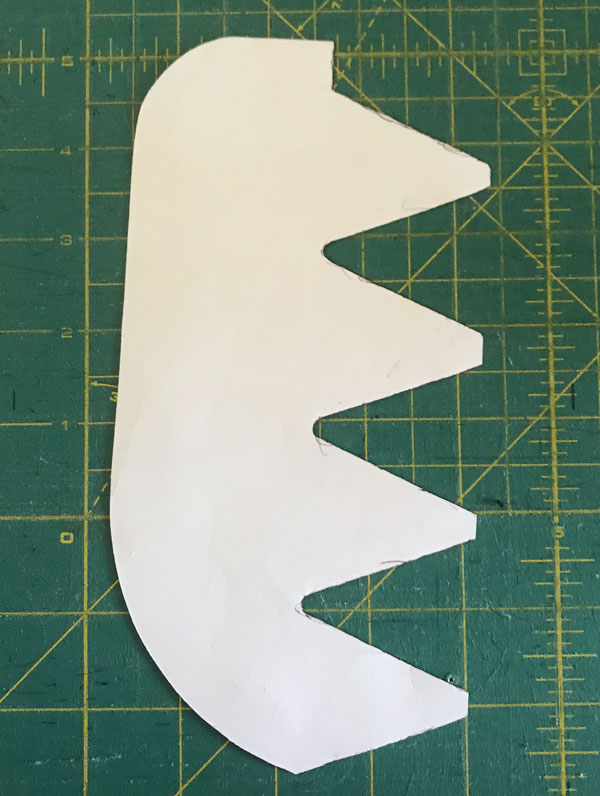
Trace onto 8 ½ x 11 paper. Leave yourself enough room on the page at all edges of the pattern.
Add ¼” seam allowance:
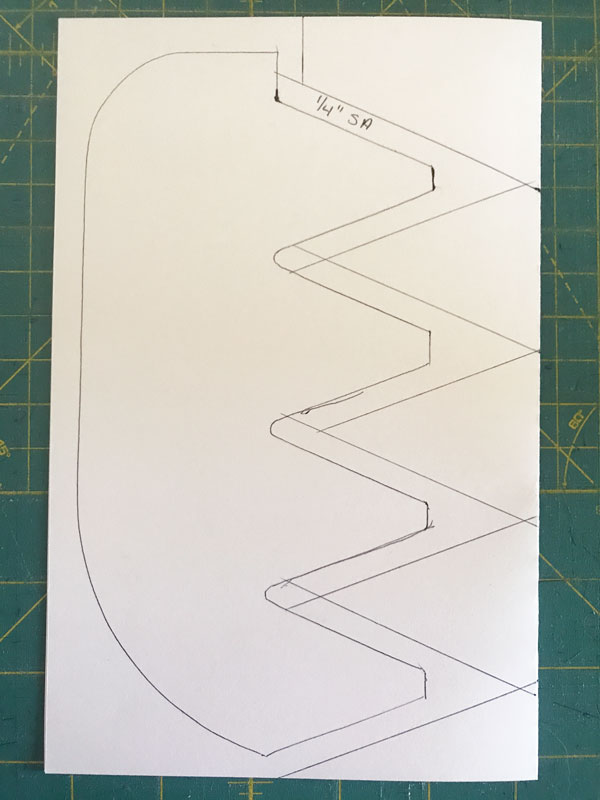
Add ¾” seam allowance at the tips of the “peaks”:
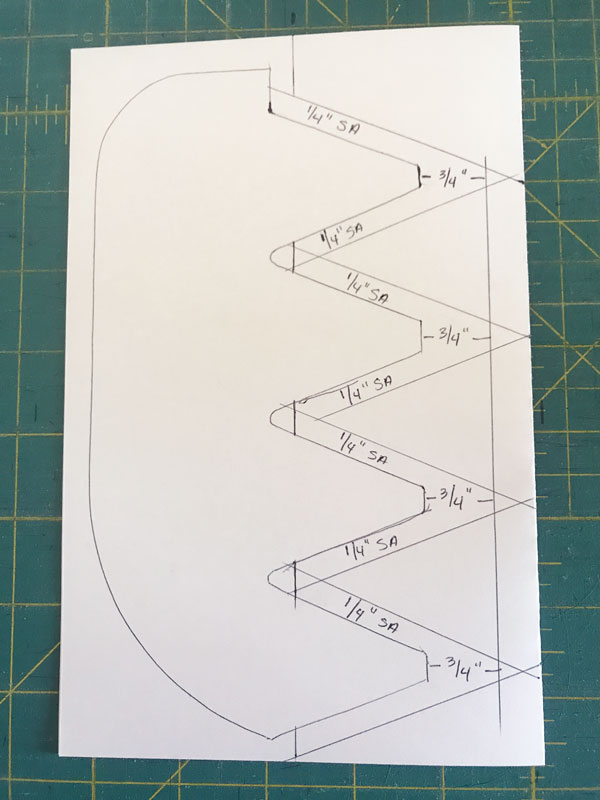
Add ¼” seam allowance at the “valleys”:
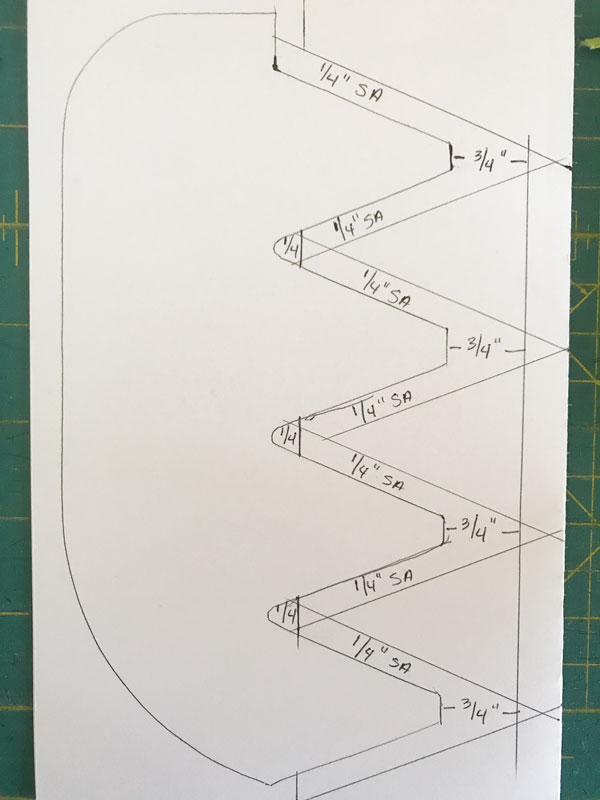
Add 1 ½” to what we are now using as the top of the Overlay pattern.
No need to add seam allowances to the outer edges of the Overlay as we will be trimming this later into the shape of the Emma flap.
Cut out the pattern with your seam allowances drawn on it. (Do NOT cut the “valley” seam allowances, just cut to where the ¼” seam allowance cross)
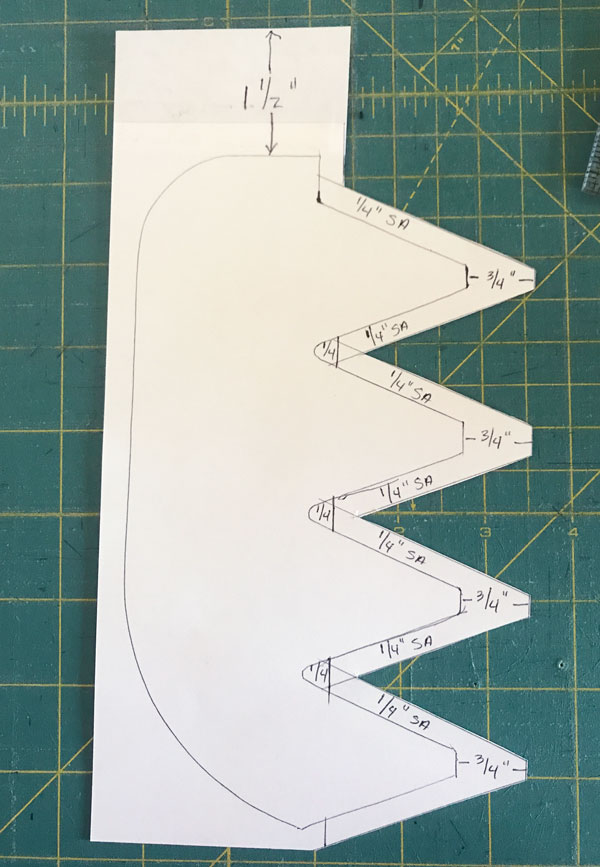
You should now have:
(1) Emma flap pattern (put aside for now).
(1) Overlay pattern at 75% without added seam allowances.
(1) Overlay pattern at 75% with added seam allowances.
Now the fun begins!! You are going to want to “audition” your fabrics to determine which will be the upper, overlay, and which one will be the Emma Flap fabric. Small, packed prints work well for this particular design paired with a solid. Go for high contrast.
Cut Fabric and Interfacing:
Fold the Overlay fabric in half wrong sides together so it is now 6W x 10 1/2H. Place the Overlay pattern piece with seam allowances on your folded fabric with the tips of the “peaks” on the fold of the fabric.
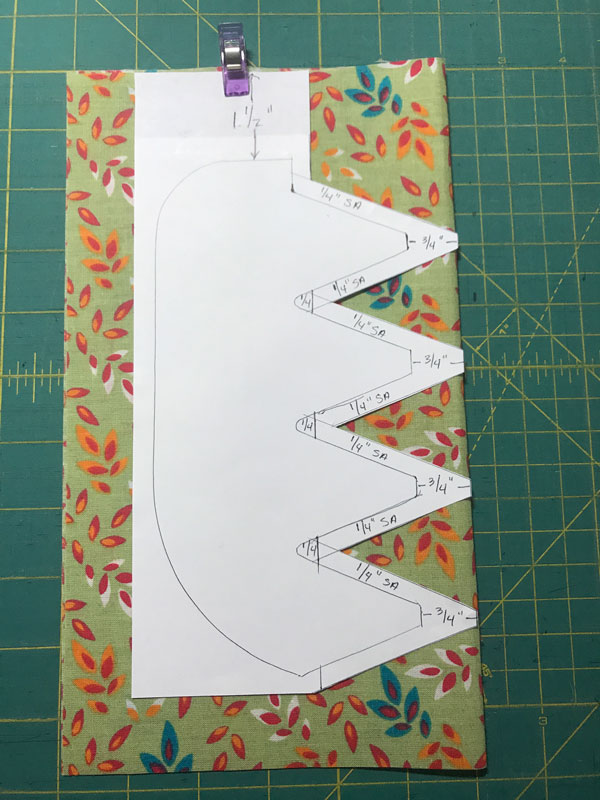
Carefully cut the “peaks” and “valleys”. Do NOT cut the bottom edge or the edge opposite the “peaks”. Those will be cut later.
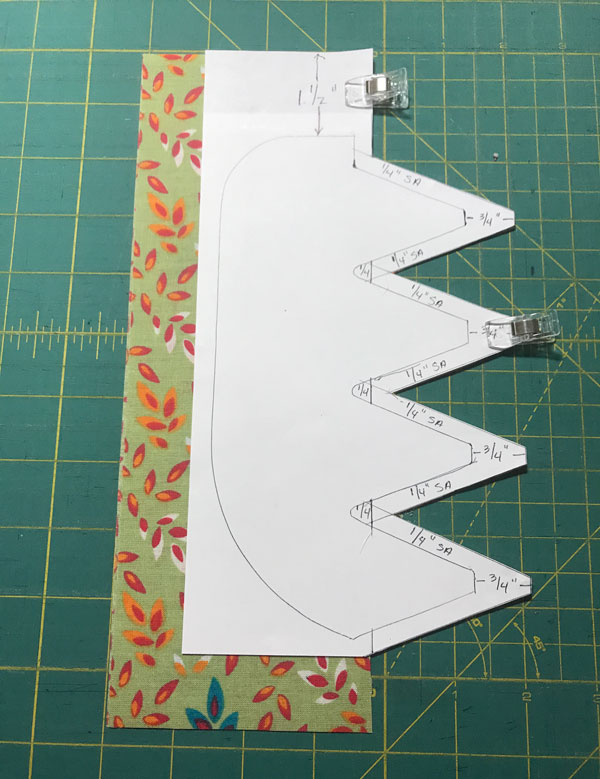
You should now have this:
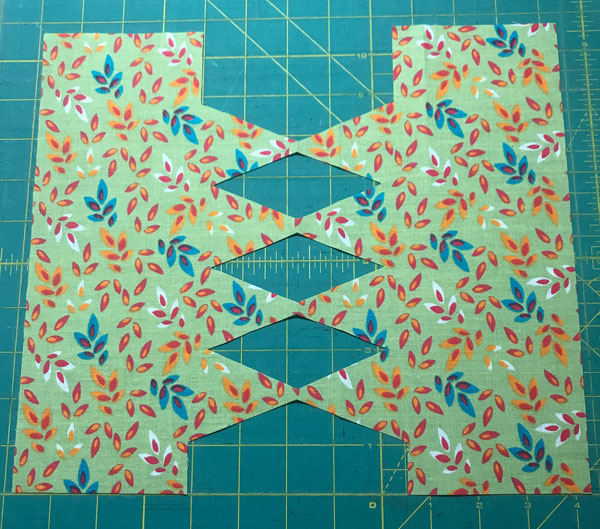
Separate the two Overlay pieces by cutting only where the fabric was folded (tip of “peak”).
TIP: Alternatively, you could cut your Overlay fabric one side at a time, flipping the pattern piece so you have a mirror image.
Retrieve the Overlay pattern piece without the seam allowances and cut your woven interfacing – remember to add 1 ½” to the top and 1” to the bottom of the pattern piece. Cut one woven interfacing using pattern piece then flip the pattern piece and cut a mirror image.
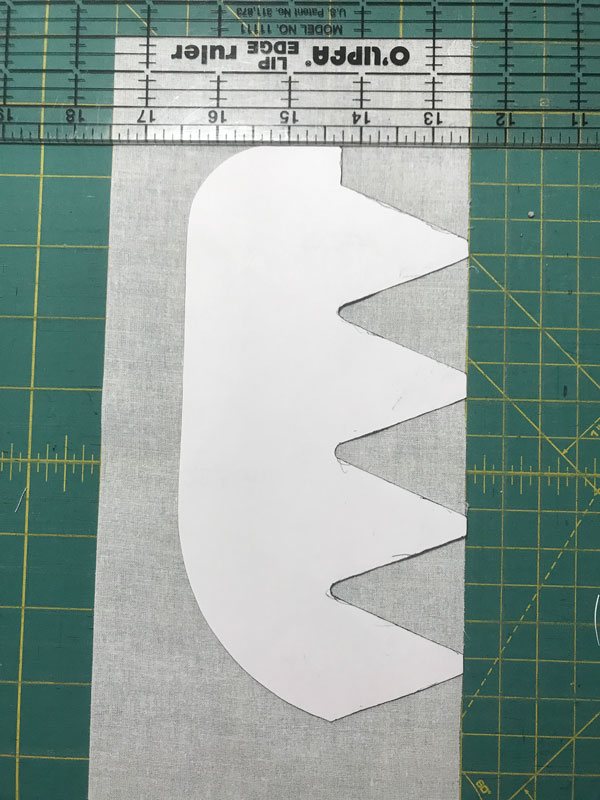
You should now have:
• (2) fabric overlays (1 is a mirror image)
• (2) woven interfacing (1 is a mirror image)
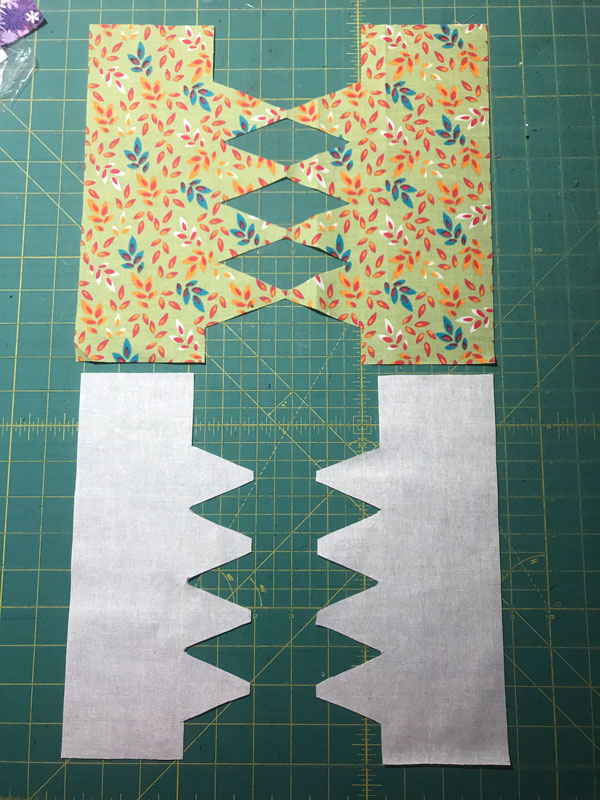
(Pretend my overlay piece is separated like the interfacing)
Now retrieve your Emma flap pattern with the 1 ½” added to the top and cut out your bottom fabric (also known as the Emma Flap fabric).
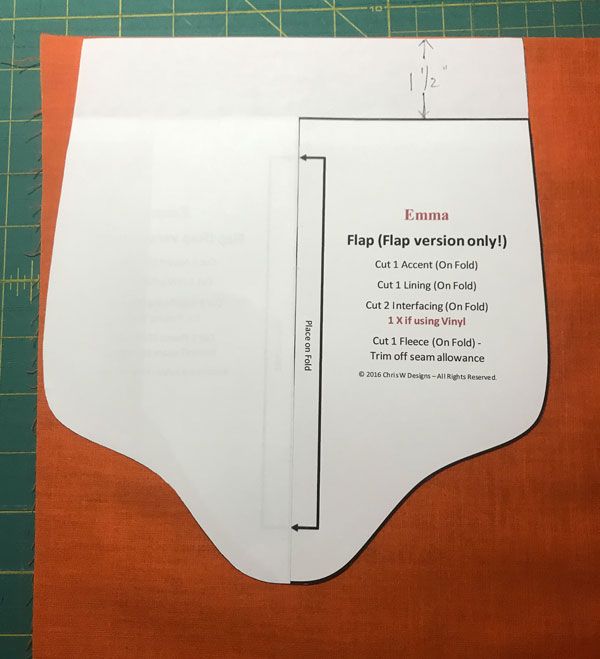
Also cut (1) woven interfacing that is about ½” smaller all the way around the fabric to keep it out of the seam allowances when sewing.
Attach Interfacing to Fabric Pieces:
Carefully align your Overlay interfacing to the wrong side of your Overlay fabric pieces, making sure the “peaks” of your interfacing are ¼” away from your cut fabric. It’s important to be precise here as this will allow for even “peaks” and “valleys”. Attach interfacing per manufacturer’s recommendation.
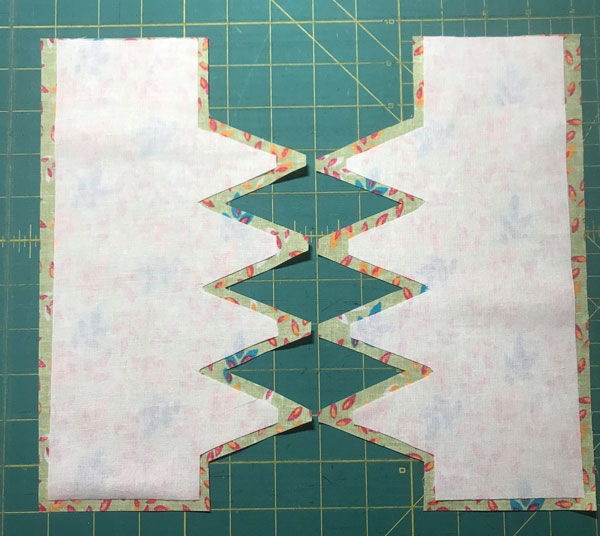
Center your Emma flap interfacing onto the wrong side of your Emma flap fabric and attach per manufacturer’s recommendation.
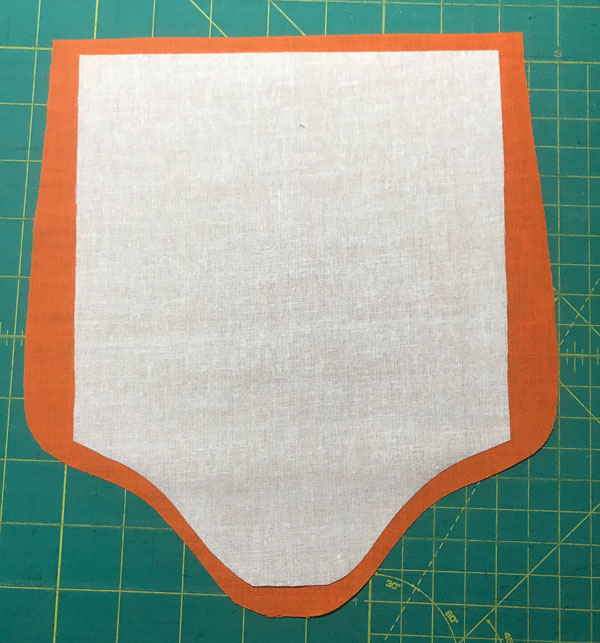
Prepare Your Overlay Fabric:
Working with your Overlay fabric interfacing side up, measure ¼” from interfacing “valley” and draw a line. Do this for all three “valleys”.
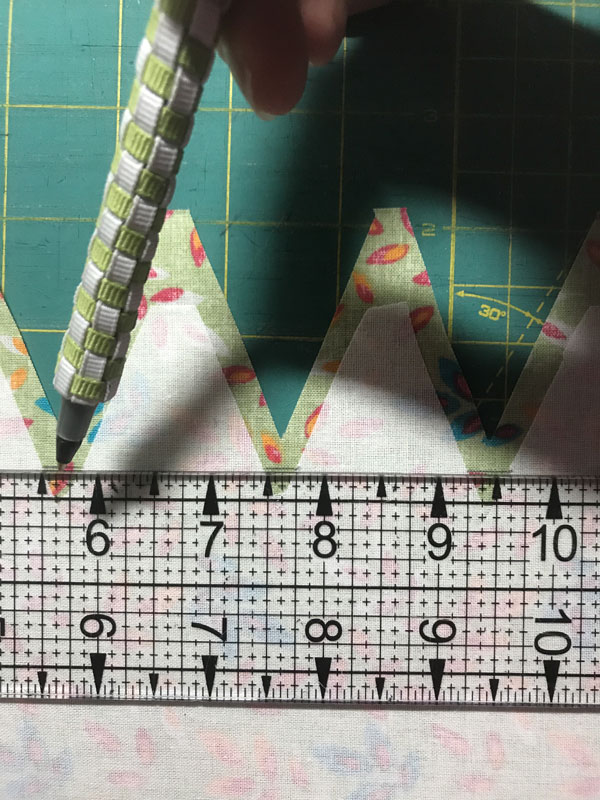
Draw triangles in the “valleys” as shown.
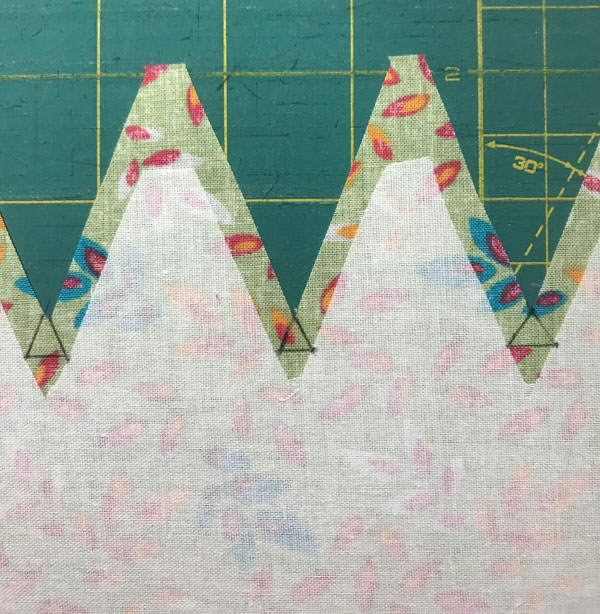
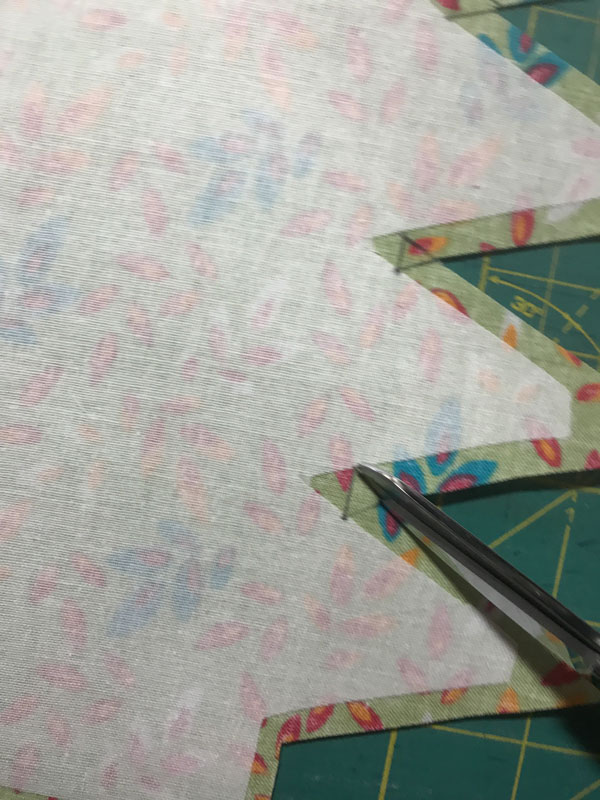
Cut ONLY the continuation of the “peaks” to the perpendicular line – this will give you the “zipper end” for folding purposes.
TIP: Because it is so important to have even seam allowances, I like to make sure mine are even. I draw “fold lines” by measuring ¼” from the fabric edges in, not the interfacing edge out. Just in case my interfacing is a little wonky.
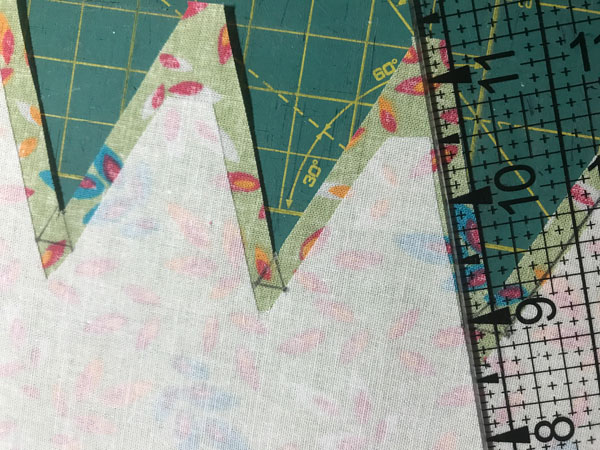
At the top and bottom corners draw and then cut an angled line.

Iron Overlay Fabric:
Things are really going to start taking shape now!! Interfacing side up, fold your little “valley” triangles wrong side together and press well.

Fold your “peak” edges wrong sides together along your fold line. Iron really well – you want crisp lines here. (If you wish, you could use ¼” Steam A Seam to help keep your edges pressed). Don’t worry too much about the tips of the “peaks” – they will be folded under later.
Here’s my Overlay side all pressed and neat – ish ?

Bling It On:
This is the moment you’ve been waiting for!
TIP: The size of your bag bling will determine how much of the bottom fabric will be visible. For the Blue Emma I used 1 ¼” rings. For the Tutorial Emma I used 1” rectangle rings. The smaller the ring, the further apart your overlay fabric will be. (I know that seems odd, but you are going to have to trust me on this.)
Go grab your bag bling.
With your Overlay pieces still interfacing side up, draw a line across the “peaks” 1” up from the straight top and bottom edges.

TIP: You may wish to use a small piece of Steam A Seam at the very tip of each peak for the following. If so, attach it to the tips per manufacturer’s instructions. You can also pin in place. I do both.
Insert the ring up to the line you just drew and fold the tip of the peak over the edge of the ring. Press if you used Steam A Seam to secure the tip, or just pin in place. Repeat for all four rings. – Be careful to line up each ring with the drawn line – this way they will all be evenly spaced.

Once all of your rings have been secured (Steam A Seam, pins, or both). Carefully flip Overlay piece right side up. You can either baste or actually top stitch just the along the edge of the ring. You will need to use a zipper foot to accomplish this. Do this for all four rings.

Repeat process for the other Overlay piece. Woohoo – Overlay fabric is lookin’ good!!

Combine Both Fabrics:
Retrieve your interfaced Emma Flap fabric (lower fabric) and fold to find center (left to right).

Place right side up and then place your Overlay fabric on top wrong side down.
Align Overlay fabric so that the rings are centered over your fold line (left to right, NOT top to bottom).
Make sure you leave ¾” of the bottom of the Emma Flap fabric peeking out from under the bottom ring. This will leave about 1/2” of fabric showing once flap is completely finished.

Once you are happy with your fabric placements, carefully pin Overlay fabric to Emma Flap fabric using two pins on top and two on bottom.

Flip combined fabrics interfacing side up. Check all measurements now from the Emma Flap fabric side and make any necessary alignment changes – you want to make sure the Overlay fabric is perfectly centered left to right so when the time comes to trim it, both Overlay sides will be even.
Flip right sides up and secure your fabric with pins. Make sure your pin placement will not interfere with sewing the “peaks” and “valleys”.
Make sure your Emma Flap fabric (lower fabric) is pulled tight – no waves or wrinkles!!
Top stitch as close to the edges of the “peaks” and “valleys” as possible using a zipper foot.

Once you have sewn both ring sides of the Overlay fabric onto the Emma Flap fabric, remove your pins and give everything a good press. You can remove the basting stitches at the rings if you previously only basted the rings to secure them.
We are SO close!!

Flip combined fabrics interfacing side up. With an 1/8” seam allowance sew the outer edges of the Emma Flap fabric to the Overlay fabric.

Carefully trim excess Overlay fabric away, following the Emma Flap fabric outline. Turn right side up and admire your hard work!

Your awesome Emma flap is now ready to be finished as per Christine’s pattern.
TIP: I would recommend using a magnetic snap closure. The center of my snap on the Blue Emma flap is 1” up from the unfinished edge.
Thank you again so much to Christine, the Admins and to all of you guys. I hope you enjoy modifying your Emma flap and I can hardly wait to see your creativity, so please share in Christine’s Facebook Group!!
XO, Sonja
——————————————————
This is AWESOME Sonja, thank you so much for sharing how you did this with us! I want to make this myself now! WOOP!
If you haven't got the Emma pattern yet, you can grab it over in the website shop here! Aussies, you can find Emma in AUD AND Wovenfuse interfacing, in the Aussie website shop HERE!


|
Comments (8)
|
Comments
Bling My Emma Flap Tutorial
Today I am happy to share a guest post from one of our lovely Facebook Group members. Sonja recently won "People's Choice" in our 2020 Colour Challenge competition, which ran over in our Facebook Group. She made an Emma with a flap so gorgeous it blew everyone away!

WOOP! Today she is sharing her method on how to make the flap. Over to you Sonja:
—————————————————————————–
Hello Everyone! I am so honored to have been asked to write this tutorial on creating a super blingy flap using ChrisW’s “Emma” pattern.
The overlay pattern can be found as a free download on YouTube here: “Mochila Rock Girl Jurubeba”. This pattern is for a mini backpack using non-woven fabrics (vinyl, cork, etc.) by Simone Jurubeba. I wanted to be able to use this pattern with woven fabrics and had to figure out how to finish all the seams, and so, here we are.
You will need:
• Emma pattern by ChrisW Designs (print at 100%)
• Mochila Rock Girl Jurubeba pattern (print at 75%).
• Overlay Fabric (the fabric on top of flap) 12” W x 10 ½” H
• Bottom Fabric (will be referred to as Emma Flap fabric)
• (4) Rings (can be round or rectangular). These are the rings I used on the Blue Emma from Hobby Lobby:

TIP: For a different look you could use eyelets and lace ribbon through them (think corset – ooh la la!!), or you could get creative with rivets as well. For this tutorial we will be using (4) 1” rectangle rings.
• Woven interfacing (such as WovenFuse)
Get your game face on, we are about to start the journey ?
Preparing Your Pattern Pieces:
Emma Flap Pattern: Add 1 ½” to the top of the flap pattern. (This will allow your top ring to be visible when the flap is closed.)
Overlay pattern: Print at 75%

Turn pattern upside down (Very important!!).

Trace onto 8 ½ x 11 paper. Leave yourself enough room on the page at all edges of the pattern.
Add ¼” seam allowance:

Add ¾” seam allowance at the tips of the “peaks”:

Add ¼” seam allowance at the “valleys”:

Add 1 ½” to what we are now using as the top of the Overlay pattern.
No need to add seam allowances to the outer edges of the Overlay as we will be trimming this later into the shape of the Emma flap.
Cut out the pattern with your seam allowances drawn on it. (Do NOT cut the “valley” seam allowances, just cut to where the ¼” seam allowance cross)

You should now have:
(1) Emma flap pattern (put aside for now).
(1) Overlay pattern at 75% without added seam allowances.
(1) Overlay pattern at 75% with added seam allowances.
Now the fun begins!! You are going to want to “audition” your fabrics to determine which will be the upper, overlay, and which one will be the Emma Flap fabric. Small, packed prints work well for this particular design paired with a solid. Go for high contrast.
Cut Fabric and Interfacing:
Fold the Overlay fabric in half wrong sides together so it is now 6W x 10 1/2H. Place the Overlay pattern piece with seam allowances on your folded fabric with the tips of the “peaks” on the fold of the fabric.

Carefully cut the “peaks” and “valleys”. Do NOT cut the bottom edge or the edge opposite the “peaks”. Those will be cut later.

You should now have this:

Separate the two Overlay pieces by cutting only where the fabric was folded (tip of “peak”).
TIP: Alternatively, you could cut your Overlay fabric one side at a time, flipping the pattern piece so you have a mirror image.
Retrieve the Overlay pattern piece without the seam allowances and cut your woven interfacing – remember to add 1 ½” to the top and 1” to the bottom of the pattern piece. Cut one woven interfacing using pattern piece then flip the pattern piece and cut a mirror image.

You should now have:
• (2) fabric overlays (1 is a mirror image)
• (2) woven interfacing (1 is a mirror image)

(Pretend my overlay piece is separated like the interfacing)
Now retrieve your Emma flap pattern with the 1 ½” added to the top and cut out your bottom fabric (also known as the Emma Flap fabric).

Also cut (1) woven interfacing that is about ½” smaller all the way around the fabric to keep it out of the seam allowances when sewing.
Attach Interfacing to Fabric Pieces:
Carefully align your Overlay interfacing to the wrong side of your Overlay fabric pieces, making sure the “peaks” of your interfacing are ¼” away from your cut fabric. It’s important to be precise here as this will allow for even “peaks” and “valleys”. Attach interfacing per manufacturer’s recommendation.

Center your Emma flap interfacing onto the wrong side of your Emma flap fabric and attach per manufacturer’s recommendation.

Prepare Your Overlay Fabric:
Working with your Overlay fabric interfacing side up, measure ¼” from interfacing “valley” and draw a line. Do this for all three “valleys”.

Draw triangles in the “valleys” as shown.

Cut ONLY the continuation of the “peaks” to the perpendicular line – this will give you the “zipper end” for folding purposes.

TIP: Because it is so important to have even seam allowances, I like to make sure mine are even. I draw “fold lines” by measuring ¼” from the fabric edges in, not the interfacing edge out. Just in case my interfacing is a little wonky.

At the top and bottom corners draw and then cut an angled line.

Iron Overlay Fabric:
Things are really going to start taking shape now!! Interfacing side up, fold your little “valley” triangles wrong side together and press well.

Fold your “peak” edges wrong sides together along your fold line. Iron really well – you want crisp lines here. (If you wish, you could use ¼” Steam A Seam to help keep your edges pressed). Don’t worry too much about the tips of the “peaks” – they will be folded under later.
Here’s my Overlay side all pressed and neat – ish ?

Bling It On:
This is the moment you’ve been waiting for!
TIP: The size of your bag bling will determine how much of the bottom fabric will be visible. For the Blue Emma I used 1 ¼” rings. For the Tutorial Emma I used 1” rectangle rings. The smaller the ring, the further apart your overlay fabric will be. (I know that seems odd, but you are going to have to trust me on this.)
Go grab your bag bling.
With your Overlay pieces still interfacing side up, draw a line across the “peaks” 1” up from the straight top and bottom edges.

TIP: You may wish to use a small piece of Steam A Seam at the very tip of each peak for the following. If so, attach it to the tips per manufacturer’s instructions. You can also pin in place. I do both.
Insert the ring up to the line you just drew and fold the tip of the peak over the edge of the ring. Press if you used Steam A Seam to secure the tip, or just pin in place. Repeat for all four rings. – Be careful to line up each ring with the drawn line – this way they will all be evenly spaced.

Once all of your rings have been secured (Steam A Seam, pins, or both). Carefully flip Overlay piece right side up. You can either baste or actually top stitch just the along the edge of the ring. You will need to use a zipper foot to accomplish this. Do this for all four rings.

Repeat process for the other Overlay piece. Woohoo – Overlay fabric is lookin’ good!!

Combine Both Fabrics:
Retrieve your interfaced Emma Flap fabric (lower fabric) and fold to find center (left to right).

Place right side up and then place your Overlay fabric on top wrong side down.
Align Overlay fabric so that the rings are centered over your fold line (left to right, NOT top to bottom).
Make sure you leave ¾” of the bottom of the Emma Flap fabric peeking out from under the bottom ring. This will leave about 1/2” of fabric showing once flap is completely finished.

Once you are happy with your fabric placements, carefully pin Overlay fabric to Emma Flap fabric using two pins on top and two on bottom.

Flip combined fabrics interfacing side up. Check all measurements now from the Emma Flap fabric side and make any necessary alignment changes – you want to make sure the Overlay fabric is perfectly centered left to right so when the time comes to trim it, both Overlay sides will be even.
Flip right sides up and secure your fabric with pins. Make sure your pin placement will not interfere with sewing the “peaks” and “valleys”.
Make sure your Emma Flap fabric (lower fabric) is pulled tight – no waves or wrinkles!!
Top stitch as close to the edges of the “peaks” and “valleys” as possible using a zipper foot.

Once you have sewn both ring sides of the Overlay fabric onto the Emma Flap fabric, remove your pins and give everything a good press. You can remove the basting stitches at the rings if you previously only basted the rings to secure them.
We are SO close!!

Flip combined fabrics interfacing side up. With an 1/8” seam allowance sew the outer edges of the Emma Flap fabric to the Overlay fabric.

Carefully trim excess Overlay fabric away, following the Emma Flap fabric outline. Turn right side up and admire your hard work!

Your awesome Emma flap is now ready to be finished as per Christine’s pattern.
TIP: I would recommend using a magnetic snap closure. The center of my snap on the Blue Emma flap is 1” up from the unfinished edge.
Thank you again so much to Christine, the Admins and to all of you guys. I hope you enjoy modifying your Emma flap and I can hardly wait to see your creativity, so please share in Christine’s Facebook Group!!
XO, Sonja
——————————————————
This is AWESOME Sonja, thank you so much for sharing how you did this with us! I want to make this myself now! WOOP!
If you haven't got the Emma pattern yet, you can grab it over in the website shop here! Aussies, you can find Emma in AUD AND Wovenfuse interfacing, in the Aussie website shop HERE!


View the entire comment thread.
Please enable JavaScript if you would like to comment on this blog.
Welcome!
- Don’t you just LOVE handbags? I know I do and I am TOTALLY addicted to making them! Imagine being able to make handbags and purses that are unique to YOU and exactly the style, colour, size and shape that YOU want them to be? ChrisW Designs range of designer bag patterns will help you to do just that! Nobody will believe you made them yourself!

Search


.sidebar-slider-sew_alongs .bx-viewport { border: 0 !important; background: transparent !important; }
.sidebar-slider-sew_alongs .bx-viewport img { margin: 0 !important; }
.sidebar-slider-sew_alongs .bx-controls { margin-top: -10px !important; }
.sidebar-slider-sew_alongs li:not(:first-of-type) { display: none; }
Sew Alongs
@chriswdesigns
.sidebar-slider-bag_making_tutorials .bx-viewport { border: 0 !important; background: transparent !important; }
.sidebar-slider-bag_making_tutorials .bx-viewport img { margin: 0 !important; }
.sidebar-slider-bag_making_tutorials .bx-controls { margin-top: -10px !important; }
.sidebar-slider-bag_making_tutorials li:not(:first-of-type) { display: none; }
Tutorials
.sidebar-slider-guest_posts .bx-viewport { border: 0 !important; background: transparent !important; }
.sidebar-slider-guest_posts .bx-viewport img { margin: 0 !important; }
.sidebar-slider-guest_posts .bx-controls { margin-top: -10px !important; }
.sidebar-slider-guest_posts li:not(:first-of-type) { display: none; }
Popular Posts
Categories
- Bag Making Resources
- Bag Making Tips
- Bag Making Tutorials
- Bag Naming Competitions!
- Bag Photos
- Blank Slate Sketches
- Blog Hops
- ChrisW Designs Bag Sewing Video Tutorials
- ChrisW Designs Patterns
- Competitions
- Easy Street Patterns
- Featured
- Free Patterns
- Fundamentals
- Giveaways!
- Guest Posts
- In the Press
- Inspirational Bags
- Minimise to Maximise
- My Ramblings
- My Studio
- NEW Patterns
- News
- Pattern Hacks
- Pattern Info!
- Ready Made Bags
- Revised Patterns
- Sales!
- Sew Alongs
- Sewing Machine Reviews
- Sewing Spaces
- Sewist Interviews
- Sponsored Posts
- Strap Series
- The Art of Bag Making
- Tools of the Trade!
- Website ChitChat
- Zipper 101
Visit Christine Welsh’s profile on Pinterest.
Junyuan Bags | Professional Bag Manufacturer
Ten articles before and after
Decorative Stitches Clutch Tutorial by Daryl of Patchouli Moon Studio – ChrisW Designs
Bag Making Tutorials – ChrisW Designs
Pieced & Applique Flap Tutorial by Daryl of Patchouli Moon Studio – ChrisW Designs
How to Choose the Perfect Bag for You – Junyuan Bags
The Art of Bag Making – Personalized Gizmo Garage – ChrisW Designs
Sewing With Cork – by Toni of The Little British Fabric Shop – ChrisW Designs


 Mobile/What's App/Wechat
 E-Mail
 ADD
ADD


