Creating digital bag patterns is faster and more precise than traditional methods. It uses software like Adobe Illustrator or CAD tools to design accurate components for bags, ensuring symmetry and efficiency. Here’s what you need to know:
- Why Digital Patterns? Instant adjustments, reduced errors, and direct compatibility with cutting machines make them a game-changer for bag manufacturing.
- Essential Tools: From Adobe Illustrator ($22.99/month) to free options like Inkscape, you can find software that fits your budget and skill level.
- Hardware Requirements: A capable computer, graphic tablet, and scanner ensure smooth digitization and design refinement.
- Key Steps: Start with a detailed sketch, digitize it, refine dimensions, and create production-ready patterns with precise labels and instructions.
- Production Prep: Export your pattern as a PDF with correct scaling and include a 1" test square to verify accuracy during printing.
This guide covers everything from tools to production tips, helping you turn your concept into a finalized digital design ready for manufacturing.
How To Make A Sewing Pattern for Bags in Adobe Illustrator | SEWING WITH STEVE
Tools and Software You’ll Need
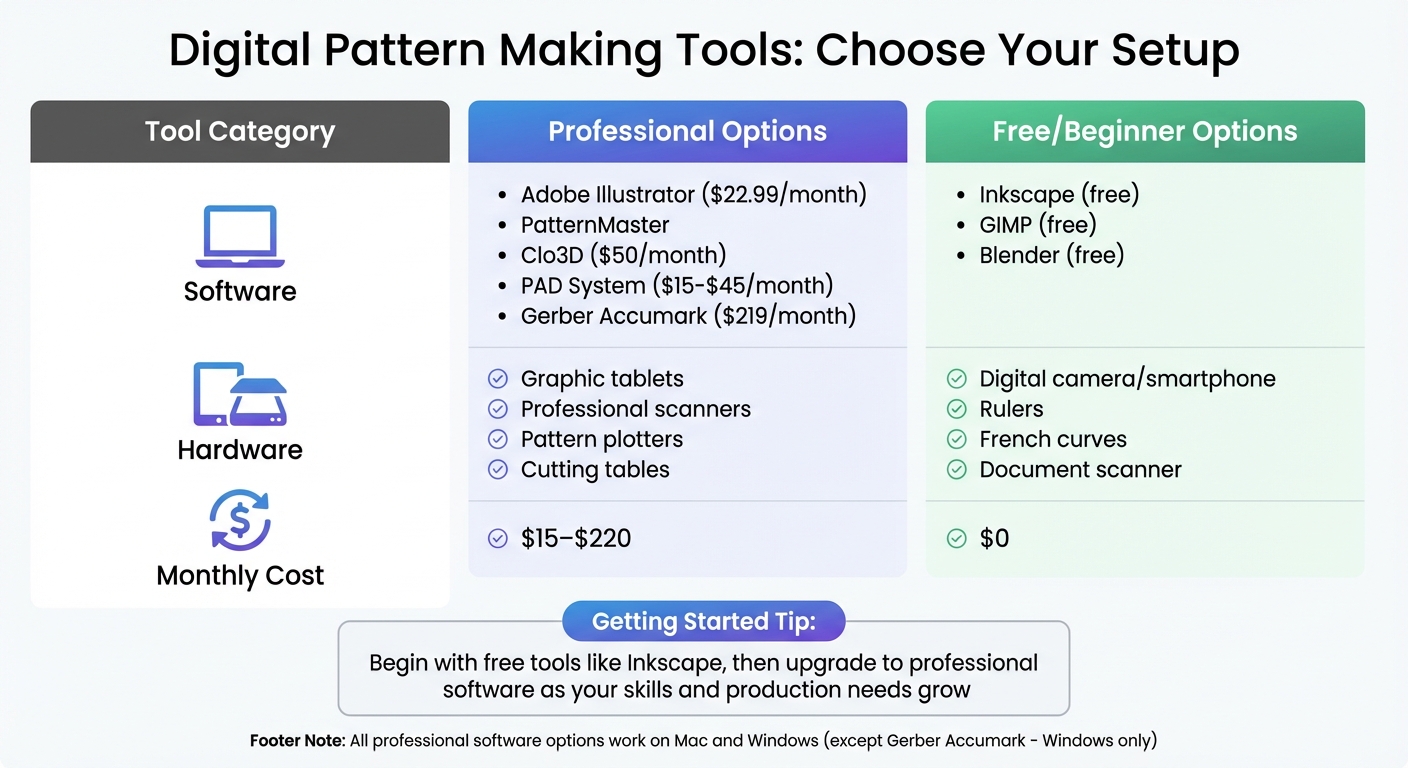
Digital Bag Pattern Creation Tools Comparison: Professional vs Free Software and Hardware Options
Finding the right tools depends on your skill level and budget. Adobe Illustrator stands out as the go-to software for digital pattern making. It offers precise measurement tools (inches or centimeters), customizable layers for intricate designs, and professional file export options. You can try it free for seven days, after which it costs $22.99/month for the standalone app or $59.99/month for the full Creative Cloud suite. As PatternLab London highlights:
Adobe Illustrator’s extensive toolset may overwhelm newcomers. With its vast array of tools, it’s a powerhouse for pattern makers and designers but can overwhelm newcomers.
Whether you’re a novice or a seasoned pro, there’s a range of software options to suit your project needs.
Professional Software Options
For those seeking specialized tools, PatternMaster is widely used by professionals for drafting patterns. If you want to test patterns in 3D before production, Clo3D offers virtual fitting features for $50/month. Another option, PAD System, provides a more affordable professional solution with plans starting at $15/month for up to 20 pieces or $45/month for unlimited pieces. These programs work on both Mac and Windows, though some, like Gerber Accumark ($219/month), are Windows-exclusive.
Free Software Options
If premium tools are out of reach, free alternatives can still get the job done. Inkscape, a popular choice for vector graphics, is particularly useful for pattern making. According to the Inkscape Project:
The only truly official tutorials are those packaged with the program… the first three are highly recommended for beginners, titled Basic, Shapes, and Advanced.
Another option is GIMP, which is free but works with raster graphics, making it less suited for scaling patterns. For those interested in 3D design, Blender includes plugins like "UV unwrap + papercraft" that convert 3D models into 2D patterns.
Hardware and Accessories
To run CAD and vector software effectively, you’ll need a capable computer. You can digitize paper sketches using a scanner or digital camera, which makes tracing and editing patterns easier. A graphic tablet is also a valuable tool for creating precise curves and detailed shapes. Keep traditional tools like a ruler, French curve, and drafting triangle on hand to ensure accuracy during digitization. For larger-scale production, consider investing in pattern plotters for full-scale templates and cutting tables for material preparation.
| Tool Category | Professional Options | Free/Beginner Options |
|---|---|---|
| Software | Adobe Illustrator, PatternMaster, Clo3D, PAD System | Inkscape, GIMP, Blender |
| Hardware | Graphic tablets, Scanners, Pattern plotters | Digital camera/smartphone, Rulers, French curves |
| Monthly Cost | $15–$220 | $0 |
With these tools, you’ll be equipped to transform your designs into production-ready patterns, setting the stage for the next steps in the process.
Preparing Your Design for Digital Work
Start with a clean, detailed sketch before moving into the digital phase. Break your bag design down into basic geometric shapes like rectangles, circles, and squares. Sammy Sewneedle from Fieldtex Products highlights the importance of this approach:
All patterns begin in the form of simple geometric shapes, such as rectangles, squares, and circles. Using different combinations of these shapes, you can draft a variety of patterns for your custom bag designs.
To ensure precision, use tools like a drafting triangle for perfect 90-degree angles and a French curve to smooth out rounded edges. This groundwork makes for a smoother transition to digital design.
Drawing and Refining Your Initial Sketch
Testing your design on a smaller scale can save both time and materials. Fashion designer Alexandra Wall suggests creating a miniature prototype to refine your pattern:
Crafting in miniature and testing my idea with paper allowed me to fold and refine my design to confirm the success of my pattern pieces and shapes before scaling up for a full-size pattern.
Once satisfied with the design, calculate the scaling multiplier (final width ÷ mock-up width) to enlarge the pattern accurately. Be sure to mark all critical details on your sketch, such as notches for alignment, grainlines, and hardware placement points, so these features transfer seamlessly into your digital file.
Converting Sketches to Digital Files
When your sketch is ready, digitize it using either photography or scanning. If you choose photography, include a ruler or cutting mat in the frame to establish scale. Sheredith from Projector Sewing emphasizes this step:
Make sure to take a picture of the pattern on your cutting mat or with a visible ruler to use as a scale.
For smaller pieces, a document scanner offers greater accuracy. For larger panels, scan them in sections, then merge the pieces in your vector software. Once imported into software like Adobe Illustrator, Inkscape, or Affinity Designer, use the Pen tool to trace the main lines and the Node tool to fine-tune curves and corners.
Ensuring Precise Dimensions
Set up your digital artboard (e.g., 100″ × 100″) with your preferred measurement units (inches or centimeters) to avoid scaling errors. Add a test square (usually 1″ × 1″) to your digital pattern. When printed, this square should measure exactly 1 inch to verify the scale is correct. If your imported sketch isn’t sized properly, use the formula (Desired Dimension ÷ Original Dimension) × 100 = Scaling Percentage to adjust it. Don’t forget that seam allowances scale too – smaller projects like coin pouches may need 1/8″ allowances, while larger items like totes can accommodate 1/2″.
Creating Your Digital Pattern
Once your design is digitized and your measurements are confirmed, it’s time to create your digital pattern. This process transforms your initial sketch into production-ready components. For example, a bag can typically be broken down into six pieces: the front panel, back panel, base, top, and two gussets. Using vector software tools like the Rectangle tool or Shape Builder, you can start crafting these geometric shapes based on your measurements.
Building the Main Bag Panels
Begin with the largest sections: the front and back panels. If your design includes rounded corners, calculate the curve length using the formula (C = 2πr), then divide by four to get the length of the quarter-circle. This ensures the gusset piece aligns perfectly with the curved edge. Use the offset tool to add seam allowances – typically 3/8 inch or 1/2 inch – on all edges that will be sewn together. To ensure precise assembly, place alignment notches at the start and end of curves, as well as at the points where the side seams meet the base.
Adding Pockets, Straps, and Hardware
Divide the panel into two sections and add seam allowances to each edge. For zippers, use an 8mm (5/16 inch) seam allowance for a standard #5 zipper. This "quarter-of-the-zipper-width" rule keeps the panel dimensions intact. Reinforce strap attachment points by marking them with a bounding box or X-box design. Don’t forget to calculate the handle drop – the distance from the bag’s top edge to the center of the strap – so the bag supports your intended carrying style.
Working with Complex Shapes and Layers
For more intricate designs, group related lines, points, and segments for better organization. If your bag requires volume, incorporate darts (triangular folds) or pleats to create a three-dimensional shape. Clearly label each pattern piece with its name, size, cutting instructions (e.g., "Cut 2"), fabric type, and a grainline arrow indicating proper alignment at 90°. Add a 1″ × 1″ test square to the pattern to verify the scaling is accurate during production. These details ensure your pattern is fully prepped for manufacturing.
sbb-itb-1e6451b
Preparing Your Pattern for Production
Once you’ve nailed down precise digital measurements, it’s time to finalize your file for production.
Setting the Correct Scale and Resolution
Accuracy in scale is key. Export your pattern as an A0 PDF (841 × 1189 mm, or about 33.1 × 46.8 in) at 100% scale using Adobe Acrobat Reader. Make sure the first page includes a 1″ × 1″ test square for verification. When printing, select options like "Actual Size", "100% Scale", or "No Scaling." Avoid settings such as "Fit to Page" or "Shrink Oversized Pages", as they can distort your dimensions [28–30].
"The most reliable way to ensure you can print patterns accurately, is by opening them and printing from the Adobe Reader software." – Sew PDF
A0 format files are compatible with engineering plotters, which means you can skip the hassle of piecing together multiple sheets. This minimizes errors during assembly [28,30].
Adding Labels and Assembly Notes
Clear and detailed labeling transforms your digital design into a production-ready blueprint. Each pattern piece should include essential information like the pattern name, bag size, creation date, and total number of parts. Add cutting instructions (e.g., "Cut 2 Shell, Cut 2 Lining") and specify the material type for each part [6,31]. Use callouts on your technical sketches to mark stitch types, dart locations, and hardware placements, such as zippers, D-rings, or magnetic closures.
"On one area of your pattern, include the following information: Name of the pattern, Size of the bag, Instructions for cutting, Number of bag parts, Date of creation." – Sammy Sewneedle, Senior Writer, Fieldtex Products
For added clarity, include an "inside view" sketch to show the lining and internal pocket construction. If your pattern spans multiple pages, add alignment graphics or labels to guide assembly [30,31]. To complete your documentation, include a Bill of Materials (BOM) that lists everything from shell fabric and lining to hardware, thread, and packaging supplies.
With detailed labels and notes in place, you’re ready to export your file in the correct format for manufacturing.
Exporting Files for Manufacturers
PDF is the go-to format for digital patterns. It works seamlessly with both home printers and professional plotters and doesn’t require specialized software to open [14,31,32]. Before exporting, save your master layout as an editable Adobe Illustrator (.ai) file to make future updates easier. Use the test square mentioned earlier to confirm accuracy during production [30,32].
For patterns with multiple sizes, use the "layers" feature in your PDF export. This allows manufacturers, like JUNYUAN BAGS, to toggle specific sizes on or off, keeping their workspace organized. Starting in January 2026, JUNYUAN BAGS will offer a "3D Tech Pack" service that creates digital prototypes in just 48 hours. This ensures all custom dimensions, logos, and patterns are accurately scaled and visualized before production begins.
Your final production file should be a complete tech pack PDF. This should include technical sketches from various angles, your BOM, and a detailed measurements table.
Testing and Printing Your Pattern
Before diving into full production, it’s crucial to make sure your digital pattern prints at the correct scale. A common pitfall is allowing the printer to automatically shrink the pattern to fit the page margins, which can throw off your measurements.
Printing a Test Version
Start by opening your PDF in Adobe Acrobat Reader – steer clear of using your web browser or default viewers like Mac Preview or Windows PDF Viewer, as these often apply unwanted scaling. Locate the page with the 1″ × 1″ test square and print it separately.
"Always print out JUST the page with the test square on." – Sarah Shortt, Pattern Designer, To Gather and Stitch
In your print settings, select "Actual Size" or "100% Scale" and turn off options like "Fit to Page", "Shrink Oversized Pages", and "Choose paper source by PDF page size". Once printed, measure the test square to ensure it’s accurate. If the square doesn’t measure correctly, check your printer’s advanced settings and try the "Print as Image" option to resolve any rendering issues.
"If you print the pattern at the wrong scale, your garment will not fit!" – Rae Hoekstra, Founder, Made by Rae
After confirming the test square’s accuracy, you can print the full pattern. For multi-size patterns, use Adobe Acrobat’s "Layers" feature to hide sizes you don’t need, which will give you cleaner cutting lines. Before cutting into your final materials, assemble a small section of the pattern using scrap fabric to check for alignment issues.
Once the scale is verified, you’re ready to organize your pattern pieces for efficient use of materials.
Arranging Pattern Pieces to Reduce Waste
With your print accuracy confirmed, it’s time to optimize your layout to reduce material waste. Bag patterns often consist of simple shapes – rectangles, squares, and circles – that can be arranged strategically to save both paper and fabric. Try different layouts, such as cross-shaped, I-shaped, or T-shaped arrangements, to maintain accurate dimensions while minimizing waste. When printing at home, aligning pattern pieces on a grid can also cut down on the total number of pages needed.
"Arrange your pattern pieces over the tiles in a way that minimizes the amount of paper needed when re-printing." – BurdaStyle
For patterns that span multiple pages, use the provided diamond-shaped markers and alignment arrows to piece everything together correctly. When taping the sheets, fold along the margins instead of cutting them off – this keeps your edges stable and ensures accuracy. Assemble the sheets in a left-to-right, top-to-bottom order, following the pattern’s overview.
If your bag design is particularly intricate, consider printing a miniature version on scrap paper. Assemble this small-scale model using glue or tape to double-check the 3D shape and construction order before committing to full-scale production.
Next Steps
After testing your digital pattern, the next move is to create a complete tech pack – the key tool for communicating with manufacturers. This document lays out everything they need to turn your concept into reality. It typically includes:
- Technical sketches: Front, back, and inside views, along with construction details and hardware specifics.
- Bill of Materials (BOM): A detailed list of every component used, such as shell materials, lining, hardware, thread, labels, and packaging.
- Measurement specification sheet: Precise dimensions and callouts for accurate production.
- Costing sheet: A breakdown of costs, including labor, materials, and packaging.
"A tech pack is a set of documents created by the design team to explain their design to a manufacturer so they can turn this information into a finished garment." – Techpacker
A well-prepared tech pack serves as the bridge between your digital design and the production phase. With this in hand, manufacturers like JUNYUAN BAGS can swiftly turn your design into a prototype. Their in-house pattern and sampling teams can transform your digital concept into a physical prototype in just 3–5 days. Using CAD systems and automated CNC cutting machines, they ensure your prototype aligns closely with your digital pattern while keeping material waste to a minimum.
"A design may go from concept to first prototype in as little as 3–5 days when the factory has in-house pattern, sampling, and material sourcing teams." – Meyzy
To finalize your design, create a physical prototype using your printed pattern. This step is crucial for testing fit and construction, allowing you to tweak seam allowances and fine-tune measurements before committing to large-scale production. Once adjustments are made, export your tech pack as a factory-ready PDF and take the final step toward turning your idea into a finished product.
FAQs
What are the benefits of using digital tools for creating bag patterns?
Using digital tools to create bag patterns comes with clear advantages in terms of speed, accuracy, and adaptability. Unlike the traditional paper-and-pencil approach, digital software lets you draft patterns quickly, tweak them in real-time, and ensure measurements are spot on. Plus, storing patterns electronically eliminates the hassle of physical storage, offering easy backups and instant access from virtually any device.
Sharing and tailoring patterns becomes a breeze too. Once your design is ready, you can export it as a file to email, upload, or send directly to manufacturers. Many programs even allow for dynamic adjustments to dimensions, making custom orders simpler and reducing the chance of mistakes. For brands like JUNYUAN BAGS, these tools mean faster production timelines, smoother collaboration with manufacturers, and the ability to efficiently meet customer demands – all while keeping in line with U.S. standards like inches, the dollar symbol ($), and the month-day-year date format.
How do I make sure my digital bag pattern prints at the correct size?
To make sure your digital bag pattern prints at the correct size, follow these steps:
- Open the PDF file using Adobe Acrobat Reader. This software is better at handling scaling accurately compared to other PDF viewers.
- Locate the test square page in your pattern file. This page usually includes a 1-inch by 1-inch square (or sometimes a larger square) to check the scale.
- When printing, set the scale to 100% to ensure the pattern prints true-to-size. If you need to resize, adjust the percentage accordingly. For patterns that span multiple pages, use the "Poster" option.
- Start by printing the test square page. Measure the square with a ruler to confirm it matches the intended size. If it’s correct, go ahead and print the entire pattern.
- After printing, align and tape the pages together. Double-check a key measurement to ensure everything is accurate.
By following these steps and verifying the test square, you’ll be able to create precise patterns for your custom bag projects, including designs for JUNYUAN BAGS.
How can I turn a hand-drawn bag sketch into a digital pattern?
To turn a hand-drawn bag sketch into a digital pattern, begin by scanning or photographing the sketch at a resolution of at least 300 dpi. This ensures all the fine details are captured clearly. Once you have the image, open it in a design program like Adobe Illustrator or a free alternative such as Inkscape. Start by cleaning up the image – adjust the brightness and contrast to make the lines stand out, and remove any stray marks. Then, use vector tools to trace the outlines, creating clean, editable paths.
After tracing, add seam allowances (usually 3/8 inch for bags in the U.S.) to the pattern. Organize the individual pieces into layers or separate files, and label them clearly with names like "Front Panel" or "Side Panel." Be sure to include helpful annotations, such as grain-line arrows or any specific instructions. Once everything is finalized, export the pattern as a PDF or AI file, making it ready for printing or sharing with manufacturers. If you’re looking for professional support, JUNYUAN BAGS specializes in turning your sketches into production-ready patterns for a variety of bag styles.


 モバイル/What's App/Wechat
 Eメール
Eメール 追加
追加


